安装MacVim来替代系统自带vim
一般情况下,Mac 自带的Vim不能满足大多的需求,所以选择安装MacVim
通过一下命令可以查看预装vim的信息
1 2 3 4 5 where vim
MacVim安装
有两种方式来安装macvim:
Github上下载macvim.dmg
使用Homebrew 安装【推荐】
brew安装macvim
为macvim中的vim创建别名,覆盖掉系统自带的vim,在~/.bash_profile中添加以下命令
1
2
3
4
5
alias vi=vimalias vim=mvimalias mvim='/usr/local/bin/mvim -v' source ~/.bash_profile
MacVim配置
在vim启动过程中,首先将查找配置文件并执行其中的命令,而这些初始化文件一般有vimrc、gvimrc和exrc三种。通过:version命令可以查看vim的配置文件信息。
vim的配置文件有全局和用户两种版本,分别存放于$VIM和$HOME目录中,用户配置文件默认是没有的,必要时由用户自己在$HOME目录下创建。可以使用:echo命令查看他们的路径,使用:e命令进入目录。
1 2 3 4 5 6 7 8 9 10 11 12 13 14 15 16 17 18 19 20 21 22 23 24 25 26 27 28 29 30 31 32 33 34 35 36 37 38 39 40 41 42 43 44 45 46 47 48 49 50 51 52 53 54 55 56 57 58 59 60 61 62 :echo $VIM local /Cellar/macvim/8.2-166_1/MacVim.app/Contents/Resources/vimecho $HOME local /Cellar/macvim/8.2-166_1/MacVim.app/Contents/Resources/vim/vimrclocal /Cellar/macvim/8.2-166_1/MacVim.app/Contents/Resources/vim/runtime/syntax/syntax.vimlocal /Cellar/macvim/8.2-166_1/MacVim.app/Contents/Resources/vim/runtime/syntax/synload.vimlocal /Cellar/macvim/8.2-166_1/MacVim.app/Contents/Resources/vim/runtime/syntax/syncolor.vimlocal /Cellar/macvim/8.2-166_1/MacVim.app/Contents/Resources/vim/runtime/filetype.vimlocal /Cellar/macvim/8.2-166_1/MacVim.app/Contents/Resources/vim/runtime/ftoff.vimautoload /vundle.vimautoload /vundle/config.vimlocal /Cellar/macvim/8.2-166_1/MacVim.app/Contents/Resources/vim/runtime/ftplugin.vimlocal /Cellar/macvim/8.2-166_1/MacVim.app/Contents/Resources/vim/runtime/indent.vimautoload /nerdtree.vimautoload /nerdtree/ui_glue.vimautoload /gitstatus.vimautoload /gitstatus/log.vimautoload /gitstatus/listener.vimlocal /Cellar/macvim/8.2-166_1/MacVim.app/Contents/Resources/vim/runtime/plugin/getscriptPlugin.vimlocal /Cellar/macvim/8.2-166_1/MacVim.app/Contents/Resources/vim/runtime/plugin/gzip.vimlocal /Cellar/macvim/8.2-166_1/MacVim.app/Contents/Resources/vim/runtime/plugin/logiPat.vimlocal /Cellar/macvim/8.2-166_1/MacVim.app/Contents/Resources/vim/runtime/plugin/manpager.vimlocal /Cellar/macvim/8.2-166_1/MacVim.app/Contents/Resources/vim/runtime/plugin/matchparen.vimlocal /Cellar/macvim/8.2-166_1/MacVim.app/Contents/Resources/vim/runtime/plugin/netrwPlugin.vimlocal /Cellar/macvim/8.2-166_1/MacVim.app/Contents/Resources/vim/runtime/plugin/rrhelper.vimlocal /Cellar/macvim/8.2-166_1/MacVim.app/Contents/Resources/vim/runtime/plugin/spellfile.vimlocal /Cellar/macvim/8.2-166_1/MacVim.app/Contents/Resources/vim/runtime/plugin/tarPlugin.vimlocal /Cellar/macvim/8.2-166_1/MacVim.app/Contents/Resources/vim/runtime/plugin/tohtml.vimlocal /Cellar/macvim/8.2-166_1/MacVim.app/Contents/Resources/vim/runtime/plugin/vimballPlugin.vimlocal /Cellar/macvim/8.2-166_1/MacVim.app/Contents/Resources/vim/runtime/plugin/zipPlugin.vimautoload /gitstatus/util.vimautoload /gitstatus/job.vim
用户配置文件
设置主题
显示帮助为中文
下载vimdoc
将文件解压到~/.vim/doc,若路径不存在则创建
打开vim执行:helptags ~/.vim/doc
在~/.vimrc中进行配置:
1 2 3 4 5 set helplang=cn if version >= 603set helplang=cnset encoding=utf-8
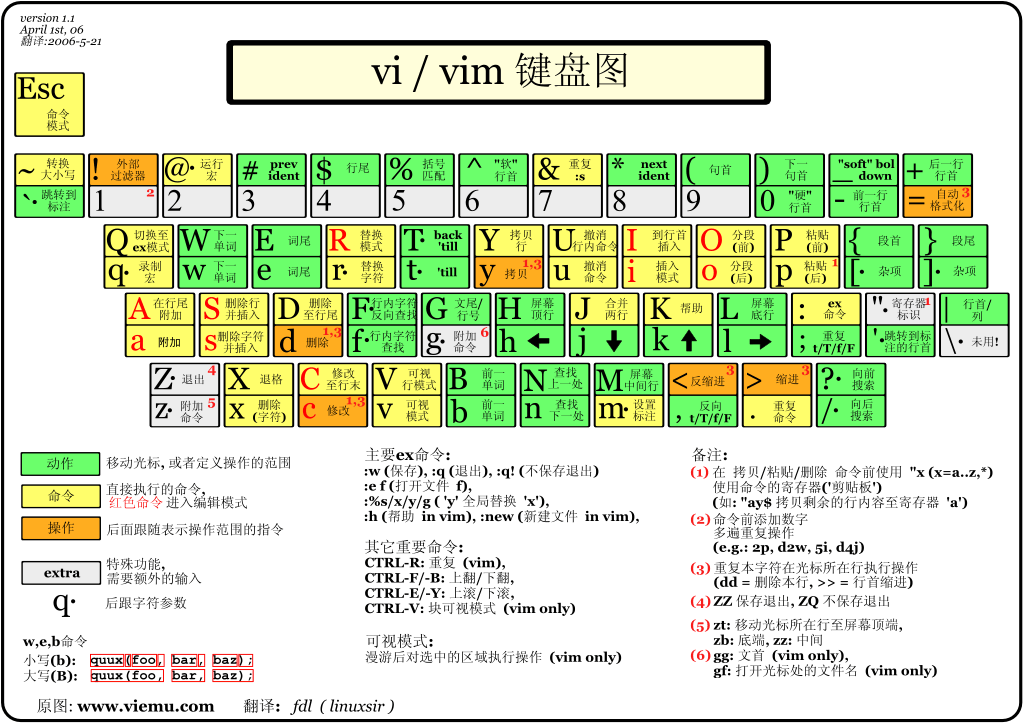
常见的vim快捷键可以看这里
字符编码
enc,fenc,fencs,tenc,一般乱码多是因这些参数设置不正确引起:
enc,vim内部使用的编码,如buffer,寄存器中的字符串,windows一般是gbk,mac是utf-8
fenc,当前打开文件自身的编码,如果enc和fenc不一致,vim会做编码转换,转换成fenc编码保存文件
fencs,一个字符编码列表,编码的自动识别就是通过它实现的
tenc,终端使用的编码,或者说vim用于屏幕显示时的编码,显示时vim会把内部编码转换为屏幕编码进行输出,默认为enc
1 2 " 将enc设置为utf-8 set enc=utf-8
vim插件管理器—Vundle
Vundle is short for Vim bundle and is a Vim plugin manager.
Vundle allows you to...
Vundle automatically...
Vundle is undergoing an interface change , please stay up to date to get latest changes.
安装Vundle
1 git clone https://github.com/gmarik/Vundle.vim.git ~/.vim/bundle/Vundle.vim
下载Vundle插件管理器,将其放置在Vim编辑器bundles文件夹中。现在,可以通过.vimrc配置文件来管理所有扩展了。
配置Vundle
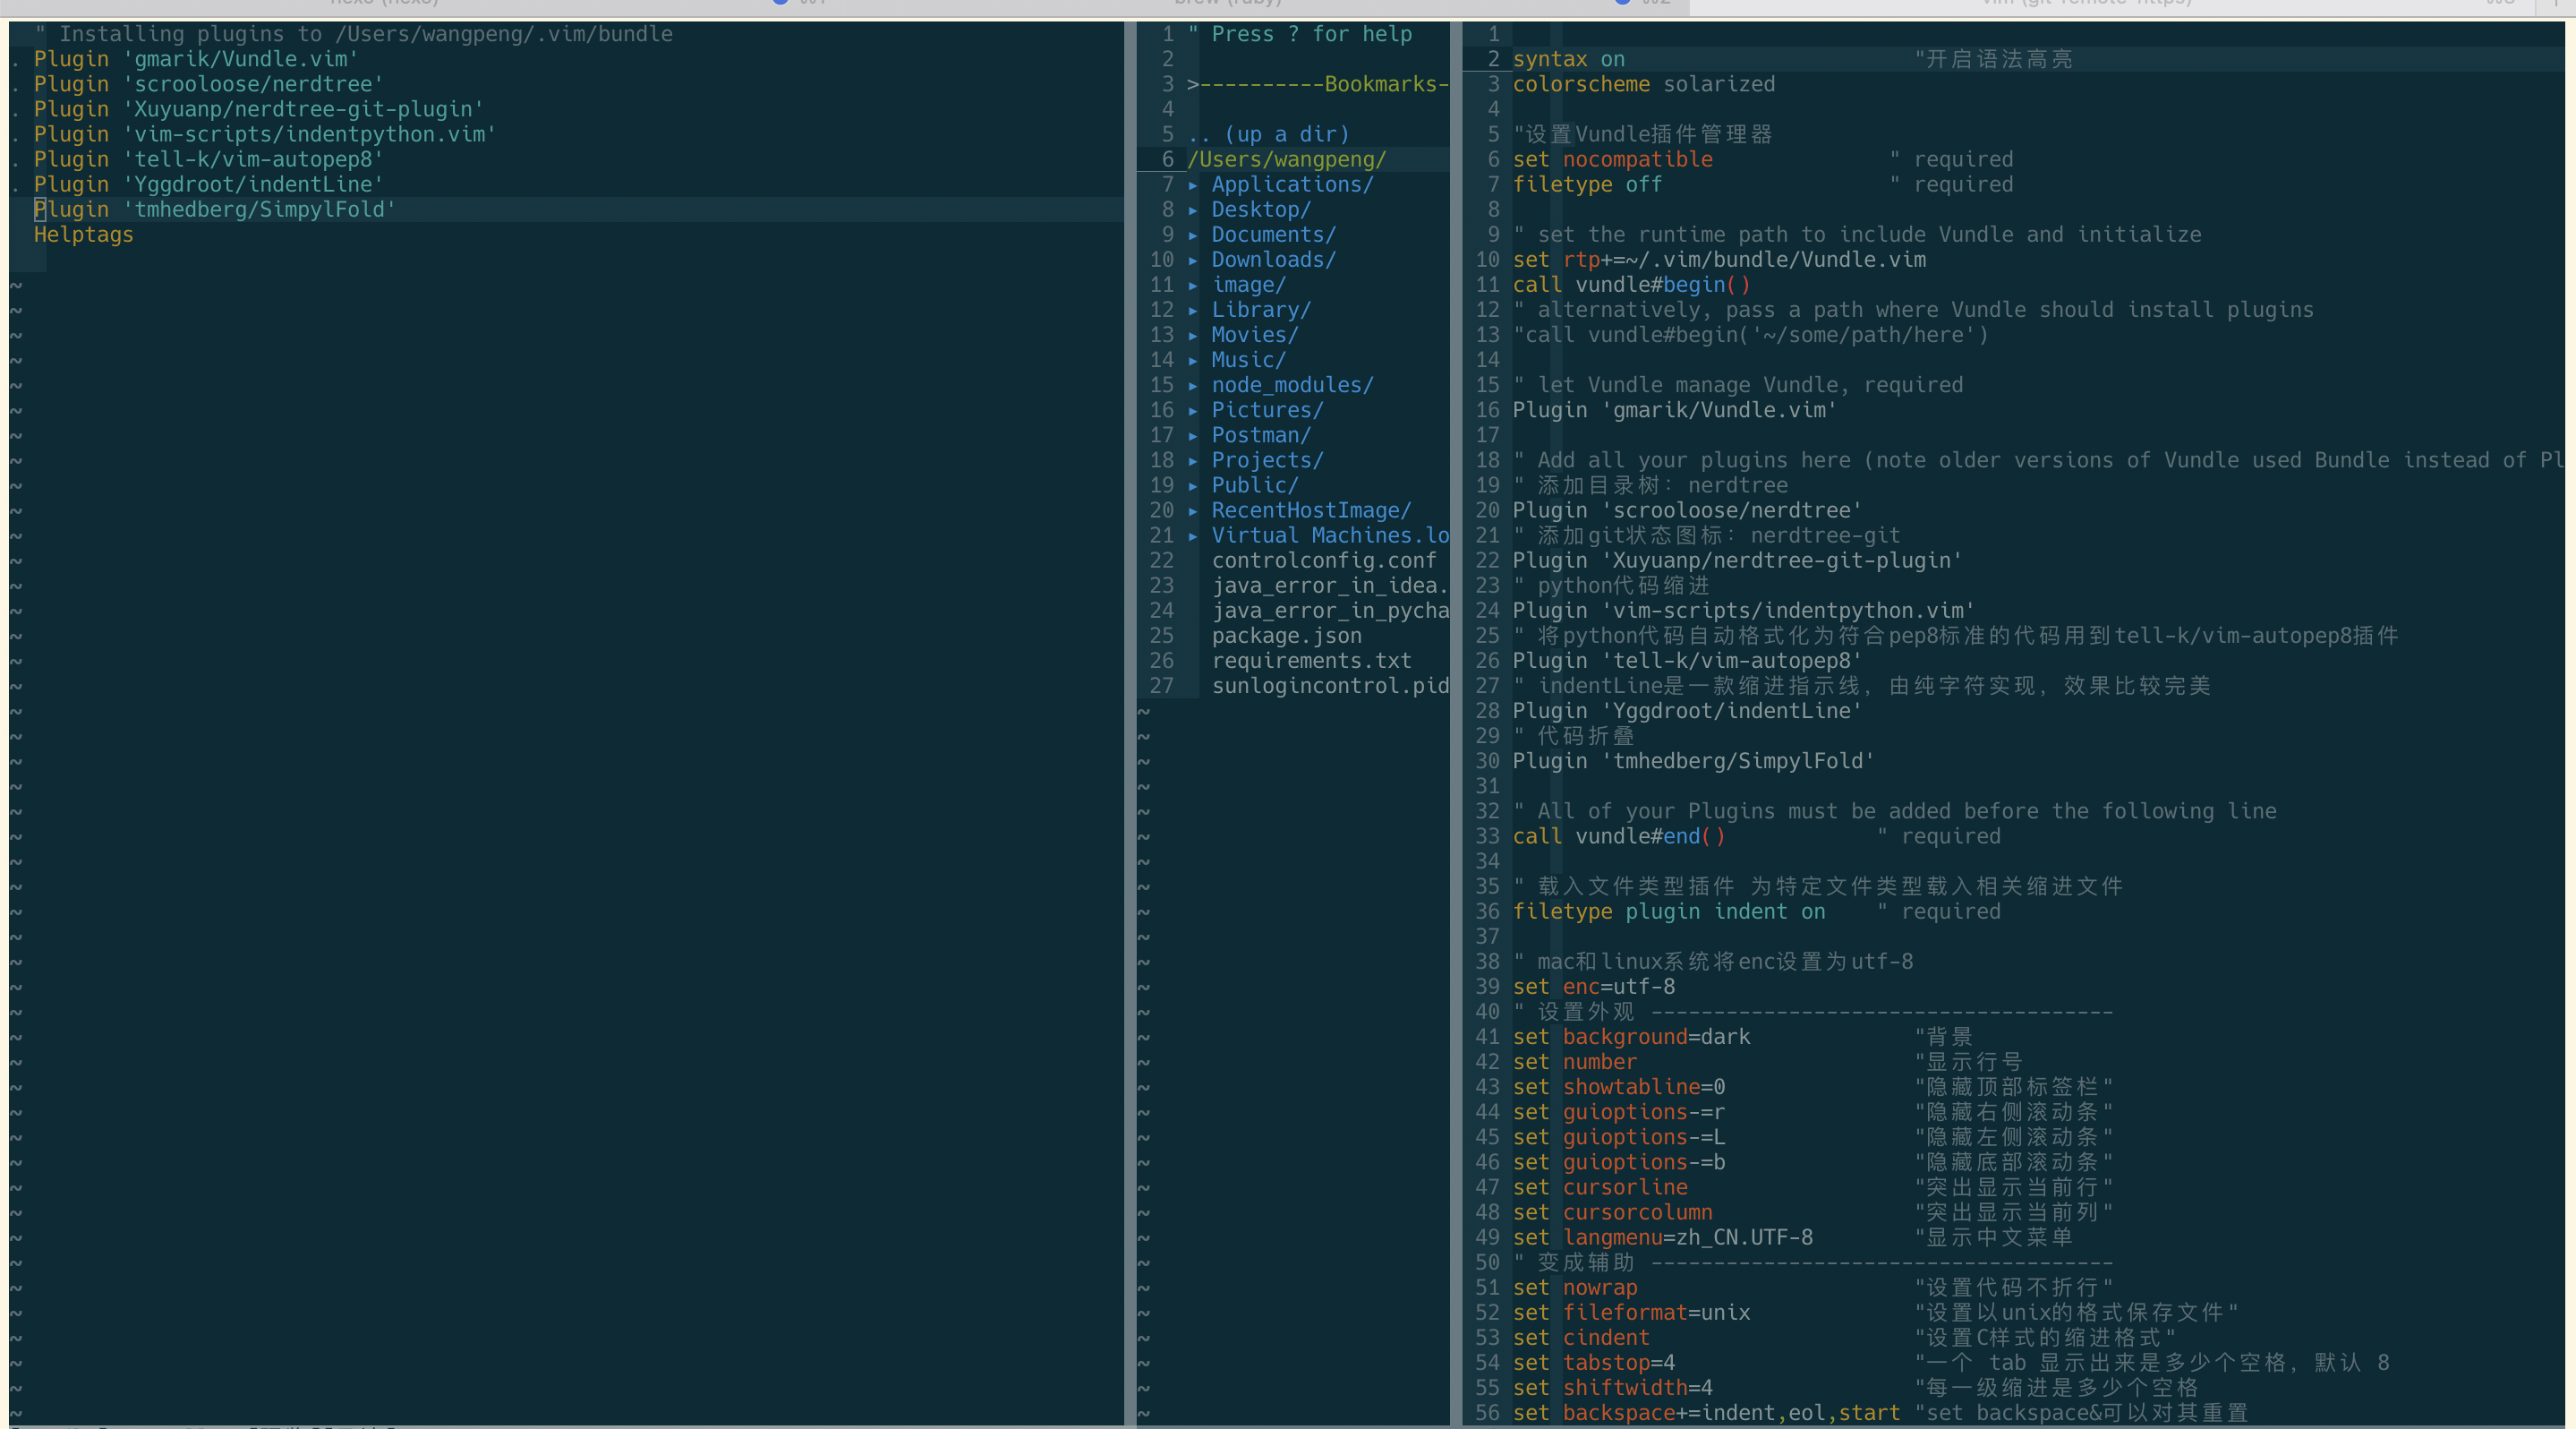
1 2 3 4 5 6 7 8 9 10 11 12 13 14 15 16 17 18 19 set nocompatible " required filetype off " required" set the runtime path to include Vundle and initialize set rtp+=~/.vim/bundle/Vundle.vim call vundle#begin() " alternatively, pass a path where Vundle should install plugins"call vundle#begin('~/some/path/here') " let Vundle manage Vundle, required'gmarik/Vundle.vim' " Add all your plugins here (note older versions of Vundle used Bundle instead of Plugin) " All of your Plugins must be added before the following line" required
使用Vundle
将想要安装的插件,按照地址填写方法,将地址填写在vundle#begin 和vundle#end 之间就可以
运行 :PluginInstall
执行:PluginInstall后的截图
移除不需要的插件
编辑.vimrc文件移除的你要移除的插件所对应的plugin那一行
输入命令:BundleClean
其他常用命令
1 2 3 4 5 6 7 :BundleList -列举列表(也就是.vimrc)中配置的所有插件
安装插件—打造IDE
以下均需要在.vimc文件中配置
添加目录树—NERDTree
NERDTree的作用就是列出当前路径的目录树,一般IDE都是有的。可以方便的浏览项目的总体的目录结构和创建删除重命名文件或文件名
安装NERDTree
添加目录树:nerdtree
1 Plugin 'scrooloose/nerdtree'
添加git状态图标:nerdtree-git
1 Plugin 'Xuyuanp/nerdtree-git-plugin'
配置NERDTree
1 2 3 4 5 6 7 8 9 10 11 12 13 14 15 16 17 18 19 20 21 22 23 24 25 26 27 28 29 30 31 32 33 34 35 36 37 38 39 40 41 42 43 44 45 46 47 48 49 50 51 "使用F3键快速调出和隐藏它 map <F3> :NERDTreeToggle<CR> let NERDTreeChDirMode=1 " 显示书签" let NERDTreeShowBookmarks=1 " 设置忽略文件类型" let NERDTreeIgnore=['\~$', '\.pyc$', '\.swp$'] " 窗口大小" let NERDTreeWinSize=25 " 修改默认箭头let g:NERDTreeDirArrowExpandable = '▸' let g:NERDTreeDirArrowCollapsible = '▾' "How can I open a NERDTree automatically when vim starts up if no files were specified? autocmd StdinReadPre * let s:std_in=1 autocmd VimEnter * if argc() == 0 && !exists(" s:std_in") | NERDTree | endif " 打开vim时自动打开NERDTree"How can I open NERDTree automatically when vim starts up on opening a directory? autocmd StdinReadPre * let s:std_in=1 autocmd VimEnter * if argc() == 1 && isdirectory(argv()[0]) && !exists(" s:std_in") | exe 'NERDTree' argv()[0] | wincmd p | ene | endif " 关闭vim时,如果打开的文件除了NERDTree没有其他文件时,它自动关闭,减少多次按:q!if (winnr("$" ) == 1 && exists("b:NERDTree" ) && b:NERDTree.isTabTree()) | q | endif" 开发的过程中,我们希望git信息直接在NERDTree中显示出来, 和Eclipse一样,修改的文件和增加的文件都给出相应的标注, 这时需要安装的插件就是 nerdtree-git-plugin,配置信息如下 let g:NERDTreeIndicatorMapCustom = { \ " Modified" : " ✹", \ " Staged" : " ✚", \ " Untracked" : " ✭", \ " Renamed" : " ➜", \ " Unmerged" : " ═", \ " Deleted" : " ✖", \ " Dirty" : " ✗", \ " Clean" : " ✔︎", \ " Unknown" : " ?" \ } " 显示行号let NERDTreeShowLineNumbers=1let NERDTreeAutoCenter=1" 在终端启动vim时,共享NERDTree let g:nerdtree_tabs_open_on_console_startup=1
分割布局
不用安装额外插件,只需要在.vimrc设置即可
1 2 3 4 5 6 7 8 9 " 指定屏幕上可以进行分割布局的区域 set splitbelow " 允许在下部分割布局set splitright " 允许在右侧分隔布局 " 组合快捷键:" 组合快捷键:- Ctrl-j 切换到下方的分割窗口 nnoremap <C-K> <C-W><C-K> " 组合快捷键:- Ctrl-k 切换到上方的分割窗口" 组合快捷键:- Ctrl-l 切换到右侧的分割窗口 nnoremap <C-H> <C-W><C-H> " 组合快捷键:- Ctrl-h 切换到左侧的分割窗口
nnoremap将一个组合快捷键映射为另一个快捷键。no部分,指的是在Vim的正常模式(Normal Mode)下, 而不是可视模式下重新映射,更多信息请看这里
Go开发插件—vim-go
vim-go 包含了运行、调试、重命名、增加移除 tag、运行单元测试、静态检查、格式化等非常多的功能。
编译使用命令 :GoBuild, 安装使用命令 :GoInstall or测试使用命令 :GoTest. 运行单元测试命令 :GoTestFunc).
运行当前文件 :GoRun.
改进了语法突出显示和折叠.
调试集成 delve:GoDebugStart.
Completion and many other features support via gopls.
formatting on save keeps the cursor position and undo history.
Go to symbol/declaration with :GoDef.
Look up documentation with :GoDoc or :GoDocBrowser.
Easily import packages via :GoImport, remove them via :GoDrop.
Precise type-safe renaming of identifiers with :GoRename.
See which code is covered by tests with :GoCoverage.
Add or remove tags on struct fields with :GoAddTags and :GoRemoveTags.
Call staticcheck:GoMetaLinter to invoke all possible linters (golint, vet, errcheck, deadcode, etc.) and put the result in the quickfix or location list.
Lint your code with :GoLint, run your code through :GoVet to catch static errors, or make sure errors are checked with :GoErrCheck.
Advanced source analysis tools utilizing guru, such as :GoImplements, :GoCallees, and :GoReferrers.
... and many more! Please see doc/vim-go.txt for more information.
Integration with gopls
The gopls instance can be shared with other Vim plugins.
Vim-go's use of gopls can be disabled and alternative tools can be used when desired.
Integration with Tagbargotags
Integration with Ultisnips
python代码缩进
代码的正确缩进是至关重要的,我们将从以下几个方面为vim配置代码缩进功能:
python代码的自动缩进
遵从PEP8 代码风格标准
自动格式化为PEP8代码
安装插件 自动缩进有用,但是在某些情况下(比如函数定义有多行的时候),并不总是会达到你想要的效果,尤其是在符合PEP8标准方面。我们可以利用indentpython.vim
1 Plugin 'vim-scripts/indentpython.vim'
将python代码自动格式化为符合pep8标准的代码用到tell-k/vim-autopep8
1 Plugin 'tell-k/vim-autopep8'
要使用tell-k/vim-autopep8插件必须先在电脑上安装python的第三方包autopep8easy-install来安装,只需要在m某个python环境下安装一次即可,实测在其他环境下也可用:
配置插件
.vimrc文件中添加下面的配置。这些设置将让Vim中的Tab键就相当于4个标准的空格符,确保每行代码长度不超过80个字符,并且会以unix格式储存文件,避免在推送到Github或分享给其他用户时出现文件转换问题。
1 2 " 按照PEP8标准来配置vim au BufNewFile,BufRead *.py set tabstop=4 |set softtabstop=4|set shiftwidth=4|set textwidth=79|set expandtab|set autoindent|set fileformat=unix
对于全栈开发,你可以设置针对每种文件类型设置au命令:
1 au BufNewFile,BufRead *.js, *.html, *.css set tabstop=2|set softtabstop=2|set shiftwidth=2
下面来配置vim-autopep8
1 2 3 4 5 " Disable show diff window let g:autopep8_disable_show_diff=1 " vim-autopep8自1.11版本之后取消了F8快捷键,需要用户自己为:Autopep8设置快捷键:
使用插件
在使用macvim编辑*.py文件时:
代码自动按照PEP8规则进行缩进;
tap键相当于4个标准空格,每行代码不超过80字符;
使用:Autopep8命令或者F8快捷键自动按照PEP8标准格式化python代码
在使用macvim编辑*.js, *.html, *.css文件时,tap键相当于2个标准空格
添加代码缩进指示线
安装indentline
indentLine是一款缩进指示线,由纯字符实现,效果比较完美
1 Plugin 'Yggdroot/indentLine'
配置indentline
indentLine
1 2 3 4 5 " 支持任意ASCII码,也可以使用特殊字符:¦, ┆, or │ ,但只在utf-8编码下有效 let g:indentLine_char='¦' " 使indentline生效let g:indentLine_enabled = 1
使用indentline
在代码缩进处,自动生成缩进指示线
代码折叠
大多数“现代”集成开发环境(IDE)都提供对方法(methods)或类(classes)进行折叠的手段,只显示类或方法的定义部分,而不是全部的代码。
安装插件
本身不用安装额外插件,但为避免出现超过你所希望的折叠数目,我们推荐SimplyFold
1 Plugin 'tmhedberg/SimpylFold'
配置插件
1
2
3
4
5
6
7
8
9
" 必须手动输入za来折叠(和取消折叠) set foldmethod=indent " 根据每行的缩进开启折叠set foldlevel=99" 使用空格键会是更好的选择,所以在你的配置文件中加上这一行命令吧: nnoremap <space> za " 希望看到折叠代码的文档字符串?let g:SimpylFold_docstring_preview=1
使用插件
在程序块处会显示折叠线,当光标放于折叠线时,按空格键可以切换在该折叠线处是否折叠。
括号自动补全
auto-pairs 主要功能是括号和引号自动补全,输入左引号和左括号自动补全另外一半,安装好就可以无需额外配置
1 Plugin 'jiangmiao/auto-pairs'
多行注释
安装插件
1 Plugin 'scrooloose/nerdcommenter'
配置插件
1 2 3 4 5 " nerdcommenter默认热键<leader > 为'\',这里将热键设置为','<F4 > <leader > ci<CR >
使用插件
在normal模式下按v并移动光标选择需要注释的行,再按F4就可以为所有选中的行添加注释
Vim日常
中文乱码
简单粗暴的方法
1 2 3 4 5 vim ~/.vimrc