【Linux】Docker安装与使用

Developers bring their ideas to life with Docker

官方文档

https://docs.docker.com/install/linux/docker-ce/centos/

安装方式

  • 设置docker源的方式来安装(简单, 官方推荐)
  • 下载rpm包的方式安装(适用于离线环境)
  • 使用脚本安装(适用于测试和开发环境)

docker源方式安装

(1)更新yum, 安装依赖

1
2
yum update
yum install -y yum-utils device-mapper-persistent-data lvm2

(2)将docker源添加到系统中

1
yum-config-manager --add-repo https://download.docker.com/linux/centos/docker-ce.repo

(3)Docker安装

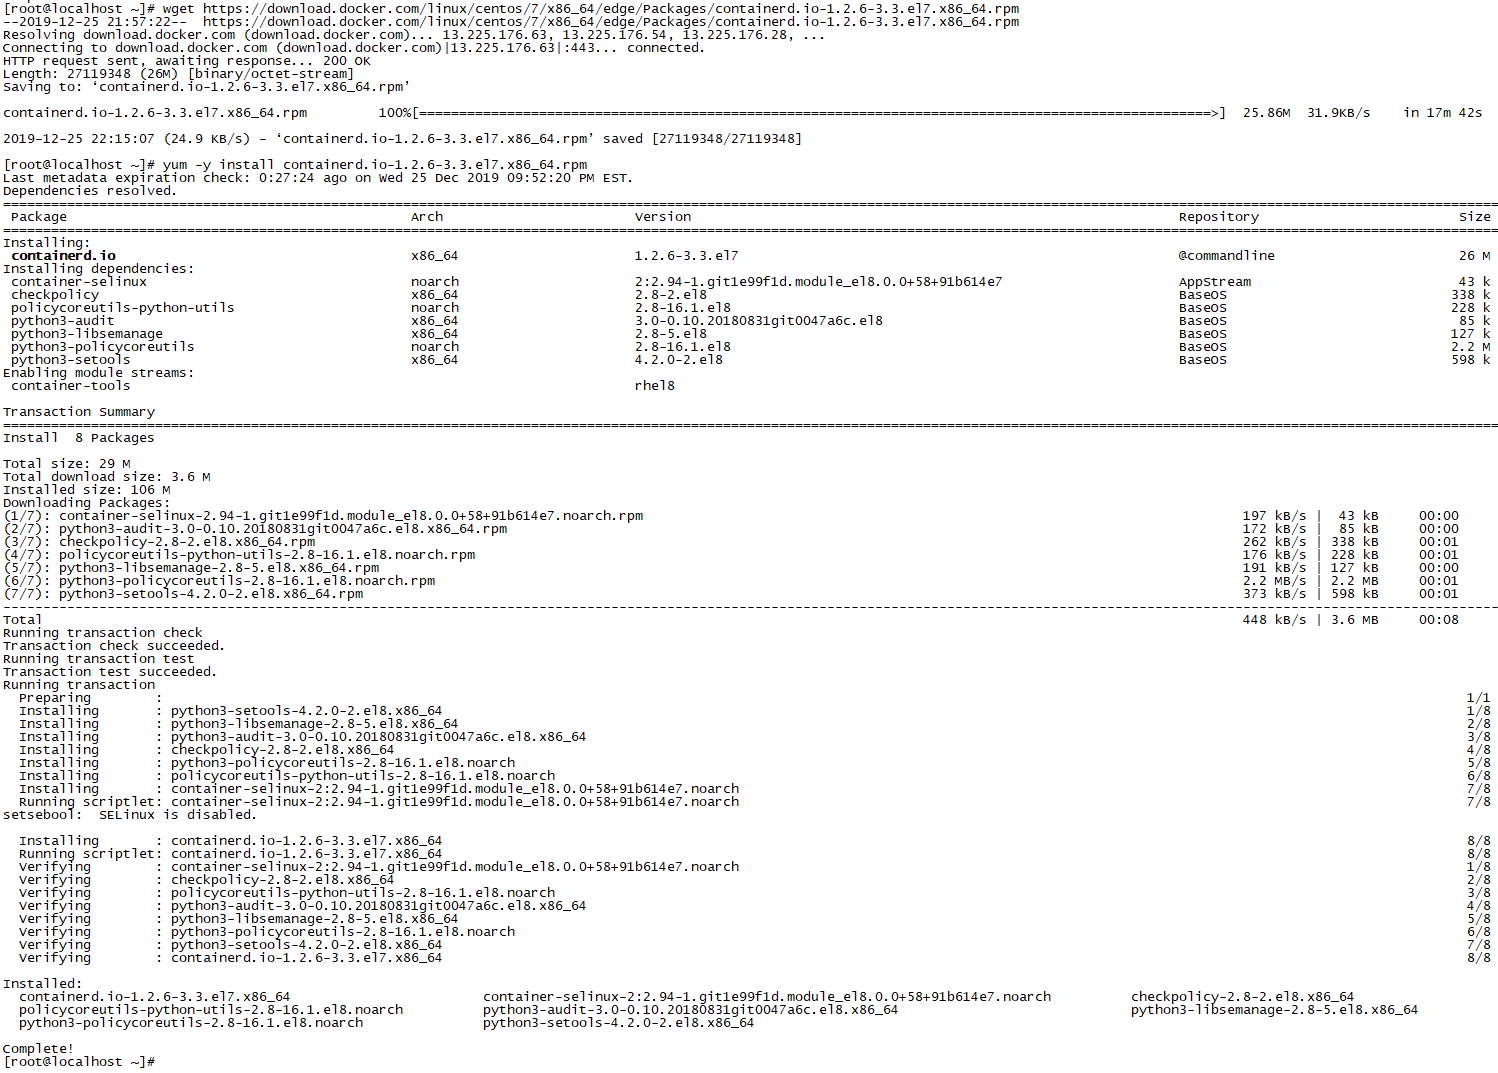
1
yum install docker-ce docker-ce-cli containerd.io

此时,可能会报错:

该图中原因是

containerd.io此软件包已经安装,并且是较低版本,与要安装的docker-ce所依赖containerd.io的版本不符,因此最好安装较新版本的containerd.io

1
2
3
4
# 下面网址可以看到一系列版本的containerd.io
https://download.docker.com/linux/centos/7/x86_64/edge/Packages/
#wget 命令下载指定版本的containerd.io(如果未安装wget,需要yum -y install wget)
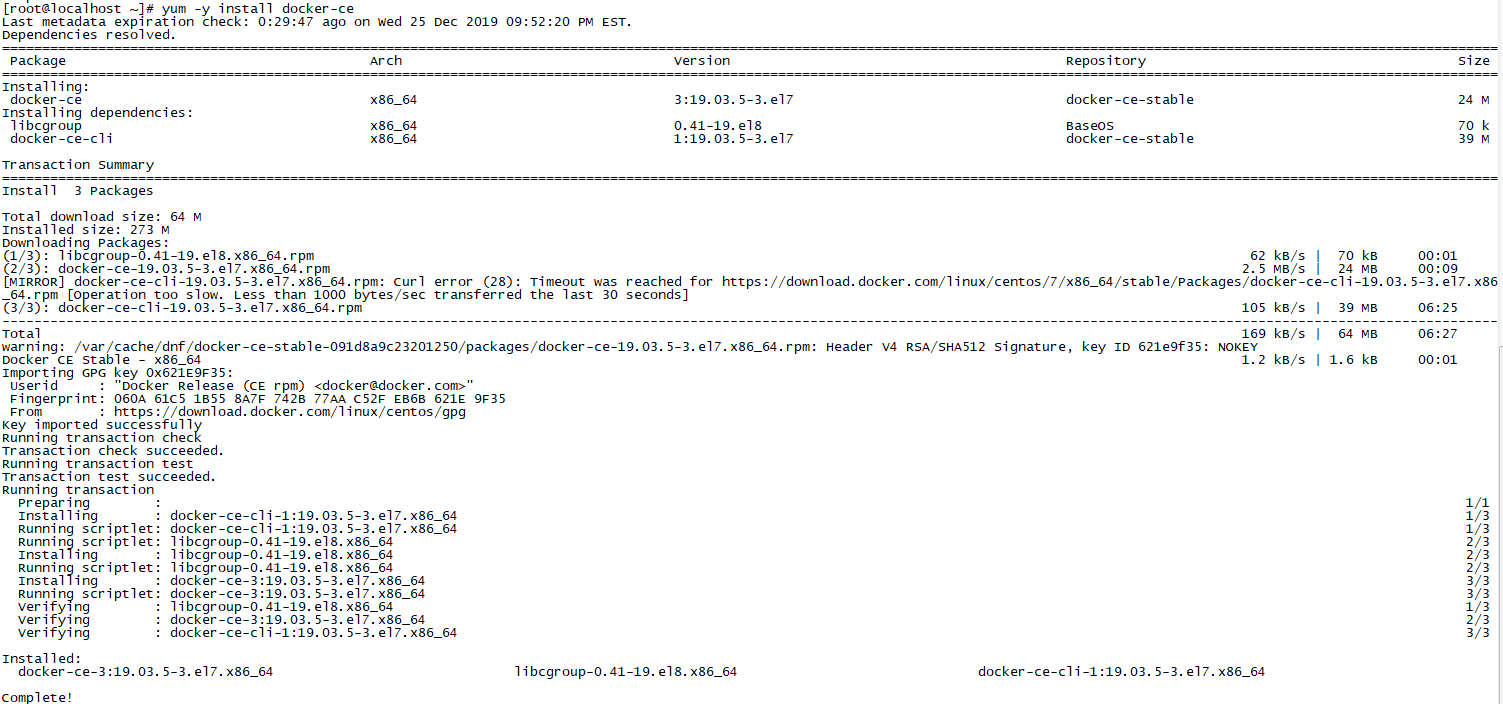
wget https://download.docker.com/linux/centos/7/x86_64/edge/Packages/containerd.io-1.2.6-3.3.el7.x86_64.rpm

重新执行安装命令

1
yum -y install docker-ce

(4)Docker启动设置-—启动docker和添加开启自启动

1
2
systemctl enable docker
systemctl start docker

(5)查看Docker版本

1
docker -v

Docker使用

docker命令

(1)命令帮助(-h已被弃用)

1
docker --help

(2)常用选项说明

  • -d, --detach=false, 指定容器运行于前台还是后台,默认为false

  • -i, --interactive=false, 打开STDIN,用于控制台交互

  • -t, --tty=false, 分配tty设备,该可以支持终端登录,默认为false

  • -u, --user="", 指定容器的用户

  • -a, --attach=[], 登录容器(必须是以docker run -d启动的容器)

  • -w, --workdir="", 指定容器的工作目录

  • -c, --cpu-shares=0, 设置容器CPU权重,在CPU共享场景使用

  • -e, --env=[], 指定环境变量,容器中可以使用该环境变量

  • -m, --memory="", 指定容器的内存上限

  • -P, --publish-all=false, 指定容器暴露的端口

  • -p, --publish=[], 指定容器暴露的端口

  • -h, --hostname="", 指定容器的主机名

  • -v, --volume=[], 给容器挂载存储卷,挂载到容器的某个目录

  • --volumes-from=[], 给容器挂载其他容器上的卷,挂载到容器的某个目录

  • --cap-add=[], 添加权限,权限清单详见:http://linux.die.net/man/7/capabilities

  • --cap-drop=[], 删除权限,权限清单详见:http://linux.die.net/man/7/capabilities

  • --cidfile="", 运行容器后,在指定文件中写入容器PID值,一种典型的监控系统用法

  • --cpuset="", 设置容器可以使用哪些CPU,此参数可以用来容器独占CPU

  • --device=[], 添加主机设备给容器,相当于设备直通

  • --dns=[], 指定容器的dns服务器

  • --dns-search=[], 指定容器的dns搜索域名,写入到容器的/etc/resolv.conf文件

  • --entrypoint="", 覆盖image的入口点

  • --env-file=[], 指定环境变量文件,文件格式为每行一个环境变量

  • --expose=[], 指定容器暴露的端口,即修改镜像的暴露端口

  • --link=[], 指定容器间的关联,使用其他容器的IP、env等信息

  • --lxc-conf=[], 指定容器的配置文件,只有在指定--exec-driver=lxc时使用

  • --name="", 指定容器名字,后续可以通过名字进行容器管理,links特性需要使用名字

  • --net="bridge", 容器网络设置:

    • bridge 使用docker daemon指定的网桥
    • host //容器使用主机的网络
    • container:NAME_or_ID >//使用其他容器的网路,共享IP和PORT等网络资源
    • none 容器使用自己的网络(类似--net=bridge),但是不进行配置
  • --privileged=false, 指定容器是否为特权容器,特权容器拥有所有的capabilities

  • --restart="no", 指定容器停止后的重启策略:

    • no:容器退出时不重启
    • on-failure:容器故障退出(返回值非零)时重启
    • always:容器退出时总是重启
  • --rm=false, 指定容器停止后自动删除容器(不支持以docker run -d启动的容器)

  • --sig-proxy=true, 设置由代理接受并处理信号,但是SIGCHLD、SIGSTOP和SIGKILL不能被代理

部署/运行镜像

pull方式

(1)下载命令

1
docker pull 镜像名

(2)[例如]下载gitlab

1
docker pull gitlab/gitlab-ce

下载的镜像所在位置(其中一个)

1
cd var/lib/docker/containers

(3)查看镜像详细信息

1
docker inspect gitlab/gitlab-ce

(4)运行镜像

1
2
3
4
5
6
7
8
9
docker run --detach \
--hostname 127.0.0.1 \
--publish 10443:443 --publish 1080:80 --publish 1022:22 \
--name gitlab \
--restart always \
--volume /srv/gitlab/config:/etc/gitlab \
--volume /srv/gitlab/logs:/var/log/gitlab \
--volume /srv/gitlab/data:/var/opt/gitlab \
gitlab/gitlab-ce:latest

这里,

127.0.0.1为服务器IP地址;

--publish 10443:443 --publish 1080:80 --publish 1022:22 是指将443端口对外映射(暴露)成10443,22端口对外映射(暴露)成1022,80端口对外映射(暴露)成1080。
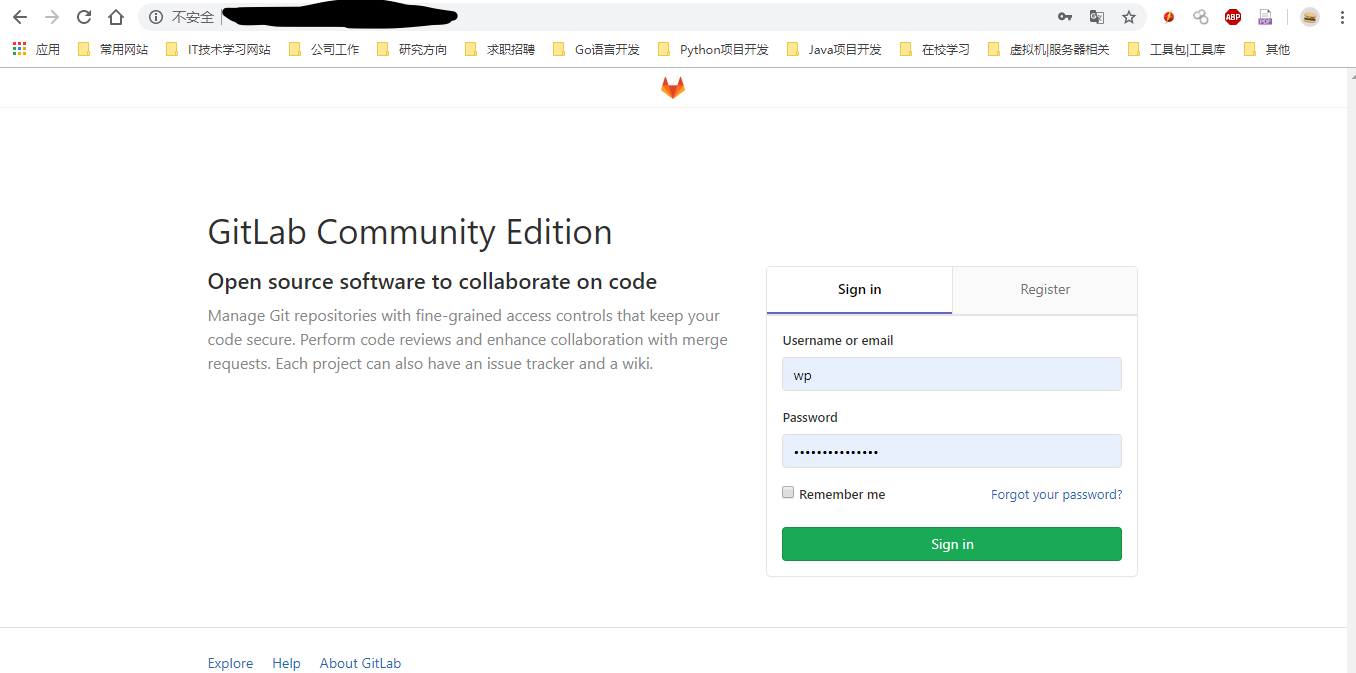
(5)访问gitlab

容器化方式(github.com上项目)

待更新

常用命令

(1)查看镜像

1
docker ps -a

这里docker ps 的命令包括:

  • -a 列出所有容器
  • -l 列出最新创建容器
  • -n=2 列出最近创建的2个容器
  • -q 仅列出容器ID
  • -s 显示容器大小

其中,

CONTAINER ID:容器ID

IMAGE:镜像名

注意:如果容器正在运行是无法删除,需要先停止

(2)stop容器

1
docker stop<容器ID或容器名>

(3)删除容器

1
docker rm <容器ID或容器名>

(4)删除镜像

1
docker rmi <镜像ID或镜像名>

镜像ID可以通过docker images

1
docker images

或docker image ls

1
docker image ls

(5)进入容器Console

1
2
3
4
# 进入控制台
docker exec -it [container name] [/bin/sh|bash]
# 退出
exit

docker磁盘占用

查看系统磁盘占用情况
1
[root@docker-app ~]# df -h
查看docker工作目录占用磁盘情况
1
[root@docker-app ~]# du -hs /var/lib/docker
docker system df
1
2
3
4
5
6
[root@docker-app ~]# docker system df
TYPE TOTAL ACTIVE SIZE RECLAIMABLE
Images 3 3 2.422GB 0B (0%)
Containers 3 3 1.676MB 0B (0%)
Local Volumes 2 2 251.4kB 0B (0%)
Build Cache 0 0 0B 0B
自动清理磁盘
1
2
3
4
5
6
7
8
9
10
11
12
13
14
15
16
17
18
19
[root@docker-app ~]# docker system prune
WARNING! This will remove:
- all stopped containers
- all networks not used by at least one container
- all dangling images
- all dangling build cache


该指令默认会清除所有如下资源:
已停止的容器(container)
未被任何容器所使用的卷(volume)
未被任何容器所关联的网络(network)
所有悬空镜像(image)
该指令默认只会清除悬空镜像,未被使用的镜像不会被删除。
添加 -a 或 --all 参数后,可以一并清除所有未使用的镜像和悬空镜像。
可以添加 -f 或 --force 参数用以忽略相关告警确认信息

注意:docker system prune -a命令清理得更加彻底,可以将没有容器使用Docker镜像都删掉。
这两个命令会把你暂时关闭的容器,以及暂时没有用到的Docker镜像都删掉了…所以使用之前一定要想清楚。
手动清理
1
2
3
4
5
6
7
8
9
10
# 查找"/"目录下所有大于100M的所有文件
[root@docker-app ~]# find / -type f -size +100M -print0 | xargs -0 du -h | sort -nr
find: ‘/proc/7572/task/7572/fdinfo/6’: 没有那个文件或目录
find: ‘/proc/7572/fdinfo/5’: 没有那个文件或目录
find: ‘/proc/7687’: 没有那个文件或目录
184M /srv/gitlab/data/prometheus/data/01F4Q52GBKGYAXCQE37V2GMS70.tmp/chunks/000001
138M /var/lib/rpm/Packages
102M /usr/lib/locale/locale-archive
32G /var/lib/docker/containers/{container_id}/{container_id}-json.log
0 /proc/kcore

发现/var/lib/docker/containers/{container_id}/下存在数据较大的*-json.log日志文件,百度发现这是docker容器运行的标准输入日志,遂删除之。项目中已使用-v的方式挂载项目输出日志文件,因此对容器运行日志没有了需求,研究后发现在构建参数的时候可以对标准输入日志大小数量进行限制,以减少日志文件对存储空间的占用,以下配置分别为日志文件最大容量、最大日志文件数。

1
docker run ...... --log-opt max-size=10m --log-opt max-file=1

新建或修改/etc/docker/daemon.json,添加log-dirver和log-opts参数

1
2
3
4
{
"log-driver":"json-file",
"log-opts": {"max-size":"10m", "max-file":"1"}
}

修改映射端口

重新部署镜像
修改部署容器配置文件

(1)停止需要修改的容器

1
docker ps -a docker stop <容器ID或容器名>

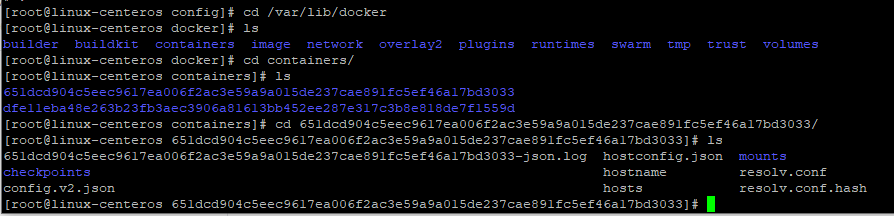
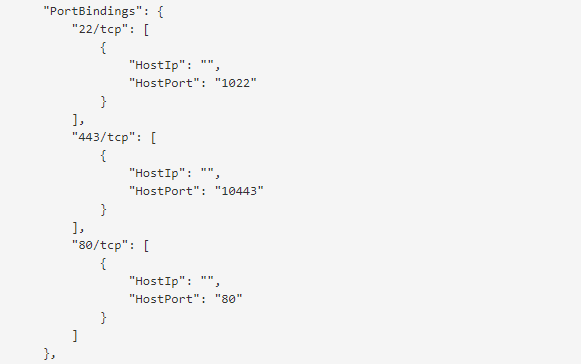
(2)找到hostconfig.json文件

1
cd /var/lib/docker/containers/<容器ID目录,例如651dcd904c5eec9617ea006f2ac3e59a9a015de237cae891fc5ef46a17bd3033>

(3)修改hostconfig.json文件中"PortBindings"配置

1
vim hostconfig.json

(4)重启docker[非常重要],否则修改会失效

1
systemctl restart docker

(5)启动修改后的容器

1
docker start <容器ID或容器名>

(6)查看是否修改成功

1
docker ps -a

Docker镜像部署容器

拉取远端镜像方式

部署portainer(docker可视化管理工具)
1
2
3
4
5
6
7
8
docker pull docker.io/portainer/portainer
docker run --detach \
--hostname 127.0.0.1 \
--publish 9000:9000 \
--name portainer\
--restart=always \
--volume /var/run/docker.sock:/var/run/docker.sock \
docker.io/portainer/portainer
部署gitlab(私有代码库)

注意:Gitlab远程命令执行漏洞在野利用预警版本升级存在依赖关系,不能跳跃升级

最好是拉去最新镜像文件。

拉取镜像并启动
1
2
3
4
5
6
7
8
9
10
11
12
docker pull gitlab/gitlab-ce:13.8.8-ce.0
docker run --detach \
--publish 443:443 --publish 80:80 --publish 1022:22 \
--name gitlab \
--restart unless-stopped \
--volume /srv/gitlab/config:/etc/gitlab \
--volume /srv/gitlab/logs:/var/log/gitlab \
--volume /srv/gitlab/data:/var/opt/gitlab \
--env GITLAB_SSH_PORT=1022 \
--log-opt max-size=1g \
--log-opt max-file=2 \
gitlab/gitlab-ce:13.8.8-ce.0
修改配置文件

等待docker运行gitlab一小段时间后在操作,否则可能出现文件找不到

gitlab.yml文件

1
2
3
4
5
6
7
8
9
vim /srv/gitlab/data/gitlab-rails/etc/gitlab.yml

# 找到如下配置
## GitLab settings
gitlab:
## Web server settings (note: host is the FQDN, do not include http://)
host: xx.xx.xx.xx # 此处替换为自己的ip
port: 80
https: false

gitlab.rb文件

1
vim /srv/gitlab/config/gitlab.rb

找到external_url,默认是被注释的。

如果打开,填写暴露出去的http://ip:portIP一定要和gitlab.yml文件配置的相同,port为你启动时指定的,这里使用默认80作为端口。

最后加上ssh协议下使用的IP和端口(这里的端口是启动时指定的,这里是1022),最后保存并退出。

1
2
3
external_url 'http://xx.xx.xx.xx:80'
gitlab_rails['gitlab_ssh_host'] = 'xx.xx.xx.xx'
gitlab_rails['gitlab_shell_ssh_host'] = '1022'
停止并移除之前启动的gitlab
1
2
# 停止并移除之前启动的GitLab容器
docker rm -f gitlab
重新启动gitlab
1
2
3
4
5
6
7
8
9
10
11
docker run --detach \
--publish 443:443 --publish 80:80 --publish 1022:22 \
--name gitlab \
--restart unless-stopped \
--volume /srv/gitlab/config:/etc/gitlab \
--volume /srv/gitlab/logs:/var/log/gitlab \
--volume /srv/gitlab/data:/var/opt/gitlab \
--env GITLAB_SSH_PORT=1022 \
--log-opt max-size=1g \
--log-opt max-file=2 \
gitlab/gitlab-ce:13.8.8-ce.0

等待一段时间,就可以访问了,首次需要更改root账户的密码

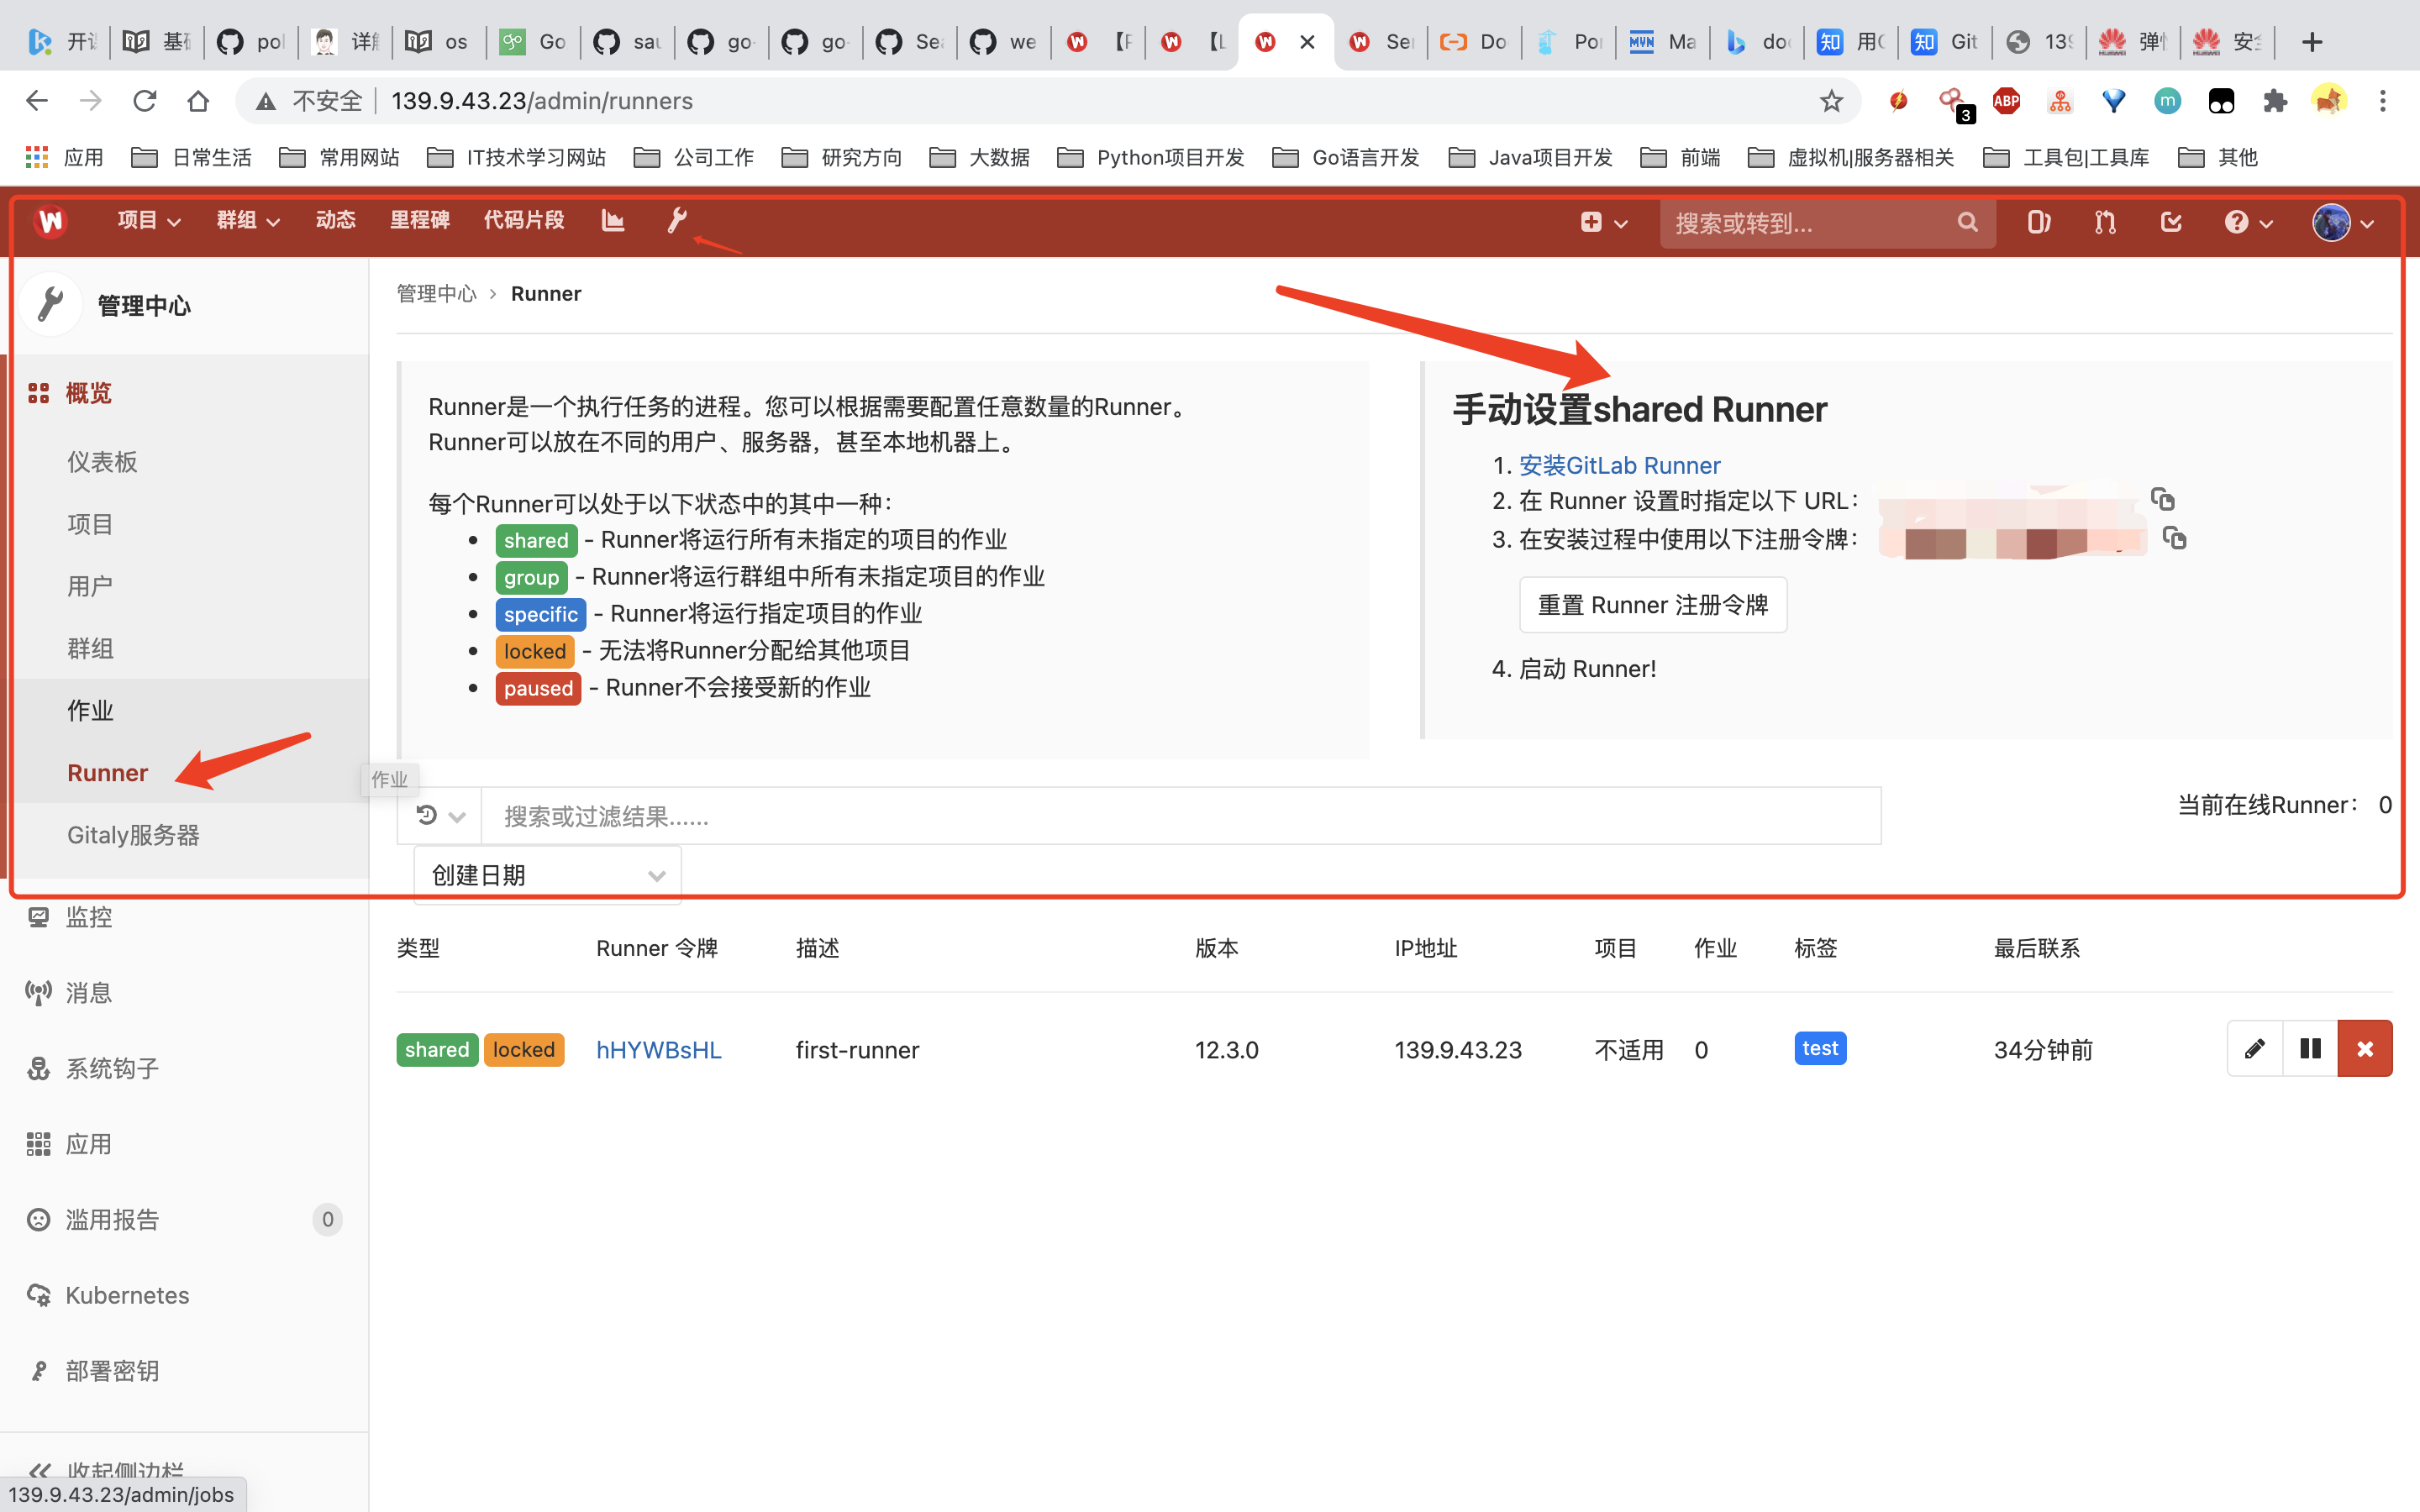
部署gitlab-runner
全局配置

所有项目都可以一起使用

Runner容器创建
  • 拉取Runner镜像并启动
1
2
3
4
5
6
docker run -d \
--name gitlab-runner \
--restart always \
--volume /srv/gitlab-runner/config:/etc/gitlab-runner \
--volume /srv/gitlab-runner/run/docker.sock:/var/run/docker.sock \
gitlab/gitlab-runner:latest
  • 自定义Runner并启动
    • 拉取镜像
    1
    docker pull gitlab/gitlab-runner:latest
    • 制作镜像
    1
    2
    3
    4
    5
    6
    7
    8
    9
    10
    11
    12
    13
    14
    15
    16
    17
    18
    19
    20
    21
    22
    23
    24
    25
    26
    27
    28
    29
    30
    31
    32
    33
    34
    35
    36
    37
    38
    39
    40
    41
    42
    43
    44
    45
    46
    47
    48
    49
    50
    51
    52
    53
    54
    55
    56
    57
    # 创建一个目录用于存放制作镜像依赖包
    mkdir -p environment
    cd environment
    # 下载搭建环境所需包
    # 创建Dockerfile文件
    vim Dockerfile
    # 例如构建go和Java开发环境
    ----------------------------------------------------------------------------------------
    # 安装go
    RUN mkdir -p /usr/local/go
    WORKDIR /usr/local/go
    COPY go1.15.14.linux-amd64.tar.gz /usr/local/go
    RUN tar -zxvf go1.15.14.linux-amd64.tar.gz && rm -fr go1.15.14.linux-amd64.tar.gz
    RUN mkdir -p /usr/local/go/works/{bin,pkg,src}

    ENV GOROOT=/usr/local/go/go
    ENV GOPATH=/usr/local/go/works
    ENV PATH $PATH:$GOROOT/bin:$GOPATH

    # 安装java
    RUN mkdir -p /usr/local/java
    WORKDIR /usr/local/java
    COPY jdk-8u141-linux-x64.tar.gz /usr/local/java/
    RUN tar -zxvf jdk-8u141-linux-x64.tar.gz && rm -fr jdk-8u141-linux-x64.tar.gz

    # 安装maven
    RUN mkdir -p /usr/local/maven
    WORKDIR /usr/local/maven
    COPY apache-maven-3.8.1-bin.tar.gz /usr/local/maven
    RUN tar -zxvf apache-maven-3.8.1-bin.tar.gz && rm -fr apache-maven-3.8.1-bin.tar.gz

    ENV JAVA_HOME=/usr/local/java/jdk1.8.0_141
    ENV MAVEN_HOME=/usr/local/maven/apache-maven-3.8.1
    ENV PATH $PATH:$JAVA_HOME/bin:$MAVEN_HOME/bin
    ----------------------------------------------------------------------------------------
    # 返回到environment上层目录,创建docker-compose.yml文件
    cd ..
    vim docker-compose.yml
    ----------------------------------------------------------------------------------------
    version: '3.1'
    services:
    gitlab-runner:
    build: enviroment
    restart: always
    container_name: gitlab-runner
    privileged: true
    volumes:
    - /srv/gitlab-runner/config:/etc/gitlab-runner
    - /srv/gitlab-runner/run/docker.sock:/var/run/docker.sock
    ----------------------------------------------------------------------------------------
    # 制作镜像
    docker-compose build
    # 查看生成的镜像
    [root@docker-app gitlab-runner]# docker images
    REPOSITORY TAG IMAGE ID CREATED SIZE
    gitlab-runner_gitlab-runner latest bdeb4ae85b83 23 hours ago 1.41GB
    gitlab/gitlab-runner latest 7d4768e27ed0 22 months ago 342MB
    • 创建容器
    1
    docker-compose up -d
Runner 注册
  • 方式一

    进入Runner容器内

    1
    docker exec -it gitlab-runner bash

    运行命令进行注册

    1
    gitlab-runner register

    输入Gitlab实地址

    地址是手动设置Runner区域里面的URL

    1
    2
    > Please enter the gitlab-ci coordinator URL (e.g. https://gitlab.com )
    http://xxx

    输入token

    token是手动设置Runner区域里面的令牌

    1
    2
    > Please enter the gitlab-ci token for this runner
    xxx

    输入Runner的描述

    Runner的描述,后面可以在GitLab中的UI中进行更改。

    1
    2
    > Please enter the gitlab-ci description for this runner
    [hostname] test-runner

    输入与Runner关联的标签

    标签是为了让后期在CI脚本中指定选择某个或者多个Runner,这里设置标签为test。当使用这个 Runner时,在.gitlab-ci.yml的 tag字段里也必须明确指明这些 tags)。

    1
    2
    > Please enter the gitlab-ci tags for this runner (comma separated):
    test

    输入Runner的执行器

    由于都是基于Docker,所以这里选择执行器为Docker。

    1
    2
    > Please enter the executor: ssh, docker+machine, docker-ssh+machine, kubernetes, docker, parallels, virtualbox, docker-ssh, shell:
    docker

    设置执行器的版本

    选择Docker作为Runner的executor,还需要指定一个默认的 基础镜像 来运行job (这会在.gitlab-ci.yml中未指明基础镜像时作为默认基础镜像使用),网上很多人都选的 alpine:latest。如果运行java项目,可以选jdk的镜像。

    1
    2
    > Please enter the Docker image (eg. ruby:2.1):
    alpine:latest

    退出容器

    1
    exit
  • 方式二

1
2
3
4
5
6
7
8
gitlab-runner register   --non-interactive \
--url "{url}" \
--registration-token "{token}" \
--executor "shell" \
--description "docker-runner" \
--run-untagged="true" \
--locked="false" \
--access-level="not_protected"

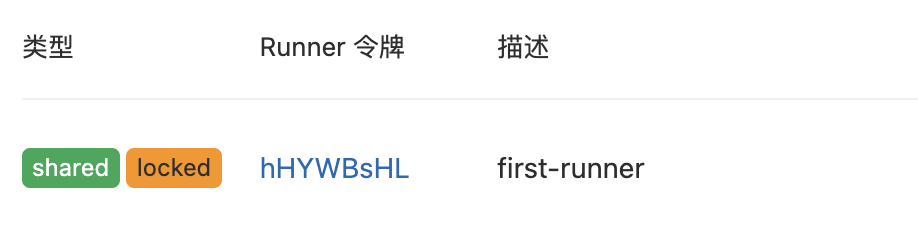
通过以上命令后,就创建成功runner啦。这时候去GitLab中创建Runner的区域刷新就能看到了。

修改配置文件
1
vim /srv/gitlab-runner/config/config.toml

找到volumes配置,修改结果为如下,分别是挂载了宿主机docker的sock文件和Maven的缓存,减少拉取Jar包的时间消耗,其中"/data/.m2/:/.m2/"这块为Maven的Jar包存放地址,左边为宿主机目录,右边为容器内的Jar包存储路径,这个需要根据自己使用的Maven镜像而定

1
volumes = ["/cache","/var/run/docker.sock:/var/run/docker.sock","/data/.m2/:/.m2/"]

volumes配置下方增加一行配置,防止Runner重复拉取镜像

1
pull_policy = "if-not-present"

最后重启Runner

1
docker restart gitlab-runner
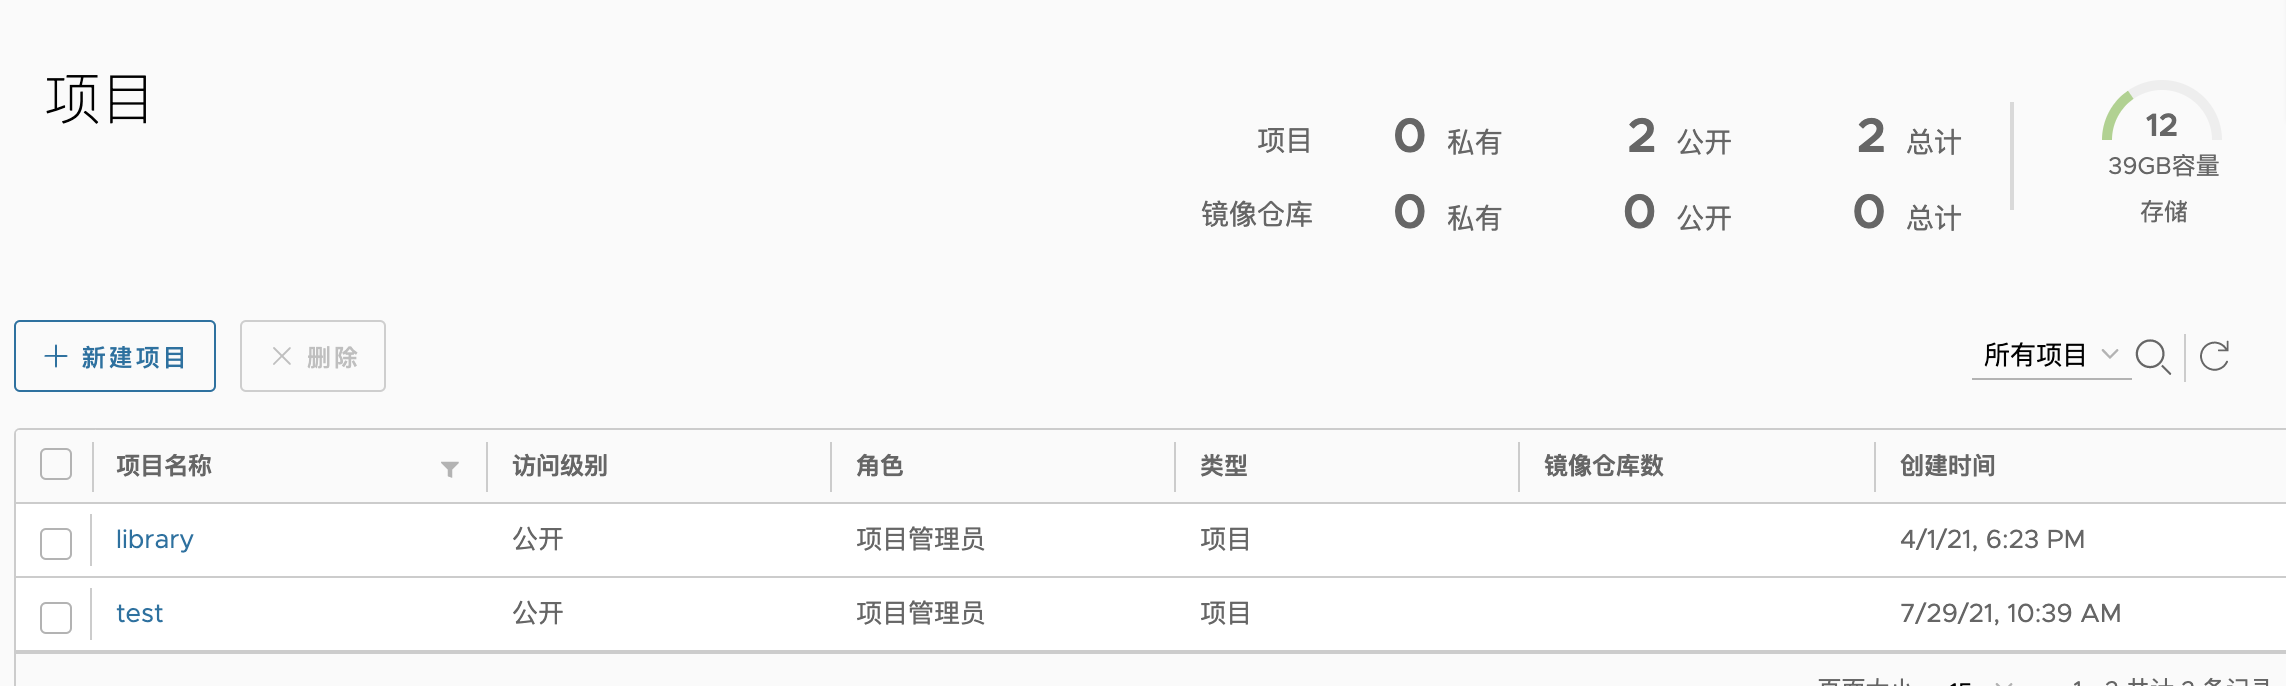
部署harbor
安装最新的docker-compose
1
2
3
4
5
6
# 下载
wget https://github.com/docker/compose/releases/download/1.28.6/docker-compose-Linux-x86_64
# 移动到/usr/local/bin
mv docker-compose-Linux-x86_64 /usr/local/bin
# 改名
mv docker-compose-Linux-x86_64 docker-compose

将可执行权限用于二进制文件

1
sudo chmod +x /usr/local/bin/docker-compose
下载Harbor

github地址:https://github.com/vmware/harbor/releases/

1
wget https://github.com/goharbor/harbor/releases/download/v2.2.1/harbor-online-installer-v2.2.1.tgz
配置Harbor

进入Harbor文件夹,找到harbor.yml文件,并配置

1
2
3
4
5
6
7
8
9
10
11
12
13
14
15
16
17
18
19
cd /srv/harbor
cp harbor.yml.tmpl harbor.yml
vim harbor.yml


hostname: xx.xx.xx.xx # 需要配置
# http related config
http:
# port for http, default is 80. If https enabled, this port will redirect to https port
port: 5000 # 需要配置 确保未安装registry容器

# https需要注释掉
# https related config
#https:
# https port for harbor, default is 443
# port: 443
# The path of cert and key files for nginx
# certificate: /your/certificate/path
# private_key: /your/private/key/path
启动

在harbor文件夹执行以下命令启动harbor

1
./install.sh
1
2
3
4
5
6
7
8
9
10
11
12
13
14
15
16
17
18
19
20
21
22
23
24
25
26
27
28
29
30
31
32
33
34
35
36
37
38
39
40
41
42
43
44
45
46
47
48
49
50
51
52
53
54
55
56
57
58
59
60
61
62
63
64
65
66
67
68
69
70
71
72
73
74
75
76
77
78
79
80
81
82
83
84
85
86
87
88
89
90
91
92
93
94
95
96
97
98
99
100
101
102
103
104
105
106
107
108
109
110
111
112
113
114
115
116
117
118
119
120
121
122
123
124
125
126
127
128
129
130
131
132
133
134
135
136
137
138
139
140
141
142
143
144
145
146
147
148
149
150
151
152
153
154
155
156
157
158
[Step 0]: checking if docker is installed ...
Note: docker version: 19.03.2

[Step 1]: checking docker-compose is installed ...
Note: docker-compose version: 1.28.6

[Step 2]: preparing environment ...

[Step 3]: preparing harbor configs ...
prepare base dir is set to /srv/harbor
Unable to find image 'goharbor/prepare:v2.2.1' locally
v2.2.1: Pulling from goharbor/prepare
84a8592c0fa5: Pull complete
6f36fbc8ef10: Pull complete
c865845f3add: Pull complete
9500bc39cfc3: Pull complete
8142a5c8d11c: Pull complete
f855906daa39: Pull complete
8a495f20b30f: Pull complete
b5cec4560407: Pull complete
Digest: sha256:ceee6b634baeeaac4d8c9344cf8daf548a1561733b1fdee1349da7523f4b297c
Status: Downloaded newer image for goharbor/prepare:v2.2.1
WARNING:root:WARNING: HTTP protocol is insecure. Harbor will deprecate http protocol in the future. Please make sure to upgrade to https
Clearing the configuration file: /config/registry/passwd
Clearing the configuration file: /config/registry/root.crt
Clearing the configuration file: /config/registry/config.yml
Clearing the configuration file: /config/db/env
Clearing the configuration file: /config/core/app.conf
Clearing the configuration file: /config/core/env
Clearing the configuration file: /config/log/rsyslog_docker.conf
Clearing the configuration file: /config/log/logrotate.conf
Clearing the configuration file: /config/registryctl/env
Clearing the configuration file: /config/registryctl/config.yml
Clearing the configuration file: /config/jobservice/env
Clearing the configuration file: /config/jobservice/config.yml
Clearing the configuration file: /config/portal/nginx.conf
Clearing the configuration file: /config/nginx/nginx.conf
Generated configuration file: /config/portal/nginx.conf
Generated configuration file: /config/log/logrotate.conf
Generated configuration file: /config/log/rsyslog_docker.conf
Generated configuration file: /config/nginx/nginx.conf
Generated configuration file: /config/core/env
Generated configuration file: /config/core/app.conf
Generated configuration file: /config/registry/config.yml
Generated configuration file: /config/registryctl/env
Generated configuration file: /config/registryctl/config.yml
Generated configuration file: /config/db/env
Generated configuration file: /config/jobservice/env
Generated configuration file: /config/jobservice/config.yml
loaded secret from file: /data/secret/keys/secretkey
Generated configuration file: /compose_location/docker-compose.yml
Clean up the input dir

[Step 4]: starting Harbor ...
Creating network "harbor_harbor" with the default driver
Pulling log (goharbor/harbor-log:v2.2.1)...
v2.2.1: Pulling from goharbor/harbor-log
84a8592c0fa5: Already exists
17adc82a5818: Pull complete
4e68f5622fec: Pull complete
bc28588a610a: Pull complete
156409f9ae72: Pull complete
92fbb332f3b2: Pull complete
6848792f2c6e: Pull complete
9fed2e290b3d: Pull complete
Digest: sha256:3d54f2ab71574658976daaa633504d975f8bf2ff0c5fa17ed1e7850e1a890d49
Status: Downloaded newer image for goharbor/harbor-log:v2.2.1
Pulling registry (goharbor/registry-photon:v2.2.1)...
v2.2.1: Pulling from goharbor/registry-photon
84a8592c0fa5: Already exists
9dedd751603f: Pull complete
90fc241c2fe4: Pull complete
6d1b59193906: Pull complete
ba079abed213: Pull complete
2b5d0f445c00: Pull complete
Digest: sha256:0ac1c3543c49bd7e12b01ea8cfb120f83b9f2c94e7ce5a7d1afaabbbc92befae
Status: Downloaded newer image for goharbor/registry-photon:v2.2.1
Pulling registryctl (goharbor/harbor-registryctl:v2.2.1)...
v2.2.1: Pulling from goharbor/harbor-registryctl
84a8592c0fa5: Already exists
76118a0eeecb: Pull complete
08ee31d5cbdd: Pull complete
66dfbfef7fd4: Pull complete
060ff5731a1a: Pull complete
f2bb1bcbb1e6: Pull complete
efa79e369997: Pull complete
Digest: sha256:32fc649e64459ce0db75f963b35d21bea680015a141edd1b6cf5bad4f8fb6ab9
Status: Downloaded newer image for goharbor/harbor-registryctl:v2.2.1
Pulling postgresql (goharbor/harbor-db:v2.2.1)...
v2.2.1: Pulling from goharbor/harbor-db
84a8592c0fa5: Already exists
0c0b756e7011: Pull complete
c1c77186d29d: Pull complete
8498cf7d0523: Pull complete
19ddfd344879: Pull complete
ae355fccaf59: Pull complete
b61a956e6543: Pull complete
c3c2a780e1ed: Pull complete
3047d1251884: Pull complete
Digest: sha256:376337a33efe5beda56c8024937f3cc5a7eda51ac50ff4fffecac0e72f910fd1
Status: Downloaded newer image for goharbor/harbor-db:v2.2.1
Pulling portal (goharbor/harbor-portal:v2.2.1)...
v2.2.1: Pulling from goharbor/harbor-portal
84a8592c0fa5: Already exists
9a38bbe2c59d: Pull complete
e48760534352: Pull complete
34a44eb25068: Pull complete
Digest: sha256:030b8285f5e3e5c1f5ee4e984111164ca0cd23f1ef892f81b4a2fd79584bfd9a
Status: Downloaded newer image for goharbor/harbor-portal:v2.2.1
Pulling redis (goharbor/redis-photon:v2.2.1)...
v2.2.1: Pulling from goharbor/redis-photon
84a8592c0fa5: Already exists
dd7b5d791088: Pull complete
2198b51de4ad: Pull complete
01053a39e952: Pull complete
2c17de361574: Pull complete
Digest: sha256:d7b4900ab786946e9857d45133639880d88b6f06b39e2e522e0185873ec7c500
Status: Downloaded newer image for goharbor/redis-photon:v2.2.1
Pulling core (goharbor/harbor-core:v2.2.1)...
v2.2.1: Pulling from goharbor/harbor-core
84a8592c0fa5: Already exists
bbc8d4f784ab: Pull complete
04c4d7fa11cd: Pull complete
4bf776cbb743: Pull complete
09b7f721edc2: Pull complete
aad1766cc86c: Pull complete
cf858f47d9c0: Pull complete
bc2e4210189d: Pull complete
3854ce3a6a61: Pull complete
e397bb5803d8: Pull complete
Digest: sha256:d8813789bd9a9dfc9bc8c439396a752a9753275b7130aad82a7e8b6cc95f5693
Status: Downloaded newer image for goharbor/harbor-core:v2.2.1
Pulling jobservice (goharbor/harbor-jobservice:v2.2.1)...
v2.2.1: Pulling from goharbor/harbor-jobservice
84a8592c0fa5: Already exists
6756e6fecf2f: Pull complete
114e327150fd: Pull complete
27542d866a20: Pull complete
9b70c73fbc90: Pull complete
f60c551036eb: Pull complete
Digest: sha256:8b617874fe5ac569172a8cb271763dd24333007bf5e040e6a3ae355ae23f7109
Status: Downloaded newer image for goharbor/harbor-jobservice:v2.2.1
Pulling proxy (goharbor/nginx-photon:v2.2.1)...
v2.2.1: Pulling from goharbor/nginx-photon
84a8592c0fa5: Already exists
5df0718a13f5: Pull complete
Digest: sha256:947b4eaabd4fd86b270bbad1e95a0e2051203cf46248ec4d7a30300e0ec57c95
Status: Downloaded newer image for goharbor/nginx-photon:v2.2.1
Creating harbor-log ... done
Creating registry ... done
Creating redis ... done
Creating harbor-db ... done
Creating registryctl ... done
Creating harbor-portal ... done
Creating harbor-core ... done
Creating harbor-jobservice ... done
Creating nginx ... done
✔ ----Harbor has been installed and started successfully.----

启动完毕后浏览器访问http://你设置的IP或者域名:你设置的端口,账号默认为:admin,密码:Harbor12345,登录后就进入了主页

push镜像

修改下配置

由于docker的版本从13开始,register只能用https,这里配置的都是http的,所以要先在/etc/docker/目录创建daemon.json文件并加入如下

1
{ "insecure-registries":["xxx:5000"] }

重启docker

1
systemctl restart docker

重启harbor相关的容器,因为重启docker后这些都关闭了,所以我们通过docker ps -a找到所有与harbor相关的镜像,通过docker restart xx xx xx对应容器名重启即可

创建项目

打包镜像

1
docker tag SOURCE_IMAGE[:TAG] [IP]:5000/test/REPOSITORY[:TAG]

登录habor

1
2
3
4
5
6
7
8
[root@docker-app harbor]# docker login [IP]:5000
Username: username
Password: *******
WARNING! Your password will be stored unencrypted in /root/.docker/config.json.
Configure a credential helper to remove this warning. See
https://docs.docker.com/engine/reference/commandline/login/#credentials-store

Login Succeeded

推送

1
docker push [IP]:5000/test/REPOSITORY[:TAG]
报错云集
1
2
3
4
5
6
7
8
9
10
11
12
13
14
15
16
17
18
19
20
21
22
23
24
遇到报错:prepare base dir is set to /usr/local/harbor
docker: Error response from daemon: OCI runtime create failed: container_linux.go:349: starting container process caused "process_linux.go:449: container init caused \"write /proc/self/attr/keycreate: permission denied\"": unknown. 
# 解决办法
把/etc/selinux下的config文件中的
SELINUX=enforcing  改为 SELINUX=disabled
 
遇到报错:ERROR:root:Please specify hostname, 那原因是启动harbor时没有修改harbor.yml里的内容。 
# 解决办法
把配置文件中默认的hostname: reg.mydomain.com, 改为本地的ip。
 比如: hostname:xx.xx.xx.xx
 
遇到报错:ERROR:root:Error: The protocol is https but attribute ssl_cert is not set。 原因是harbor.yml中默认是配置https的端口及证书路径的。
# 解决办法
把这些配置都注释掉。
# https related config
# https:
  # https port for harbor, default is 443
  # port: 443
  # The path of cert and key files for nginx
  # certificate: /your/certificate/path
  # private_key: /your/private/key/path
 
上述问题都解决,并且install.sh正确运行后, 信息如下:
✔ ----Harbor has been installed and started successfully.----
部署Registry服务器

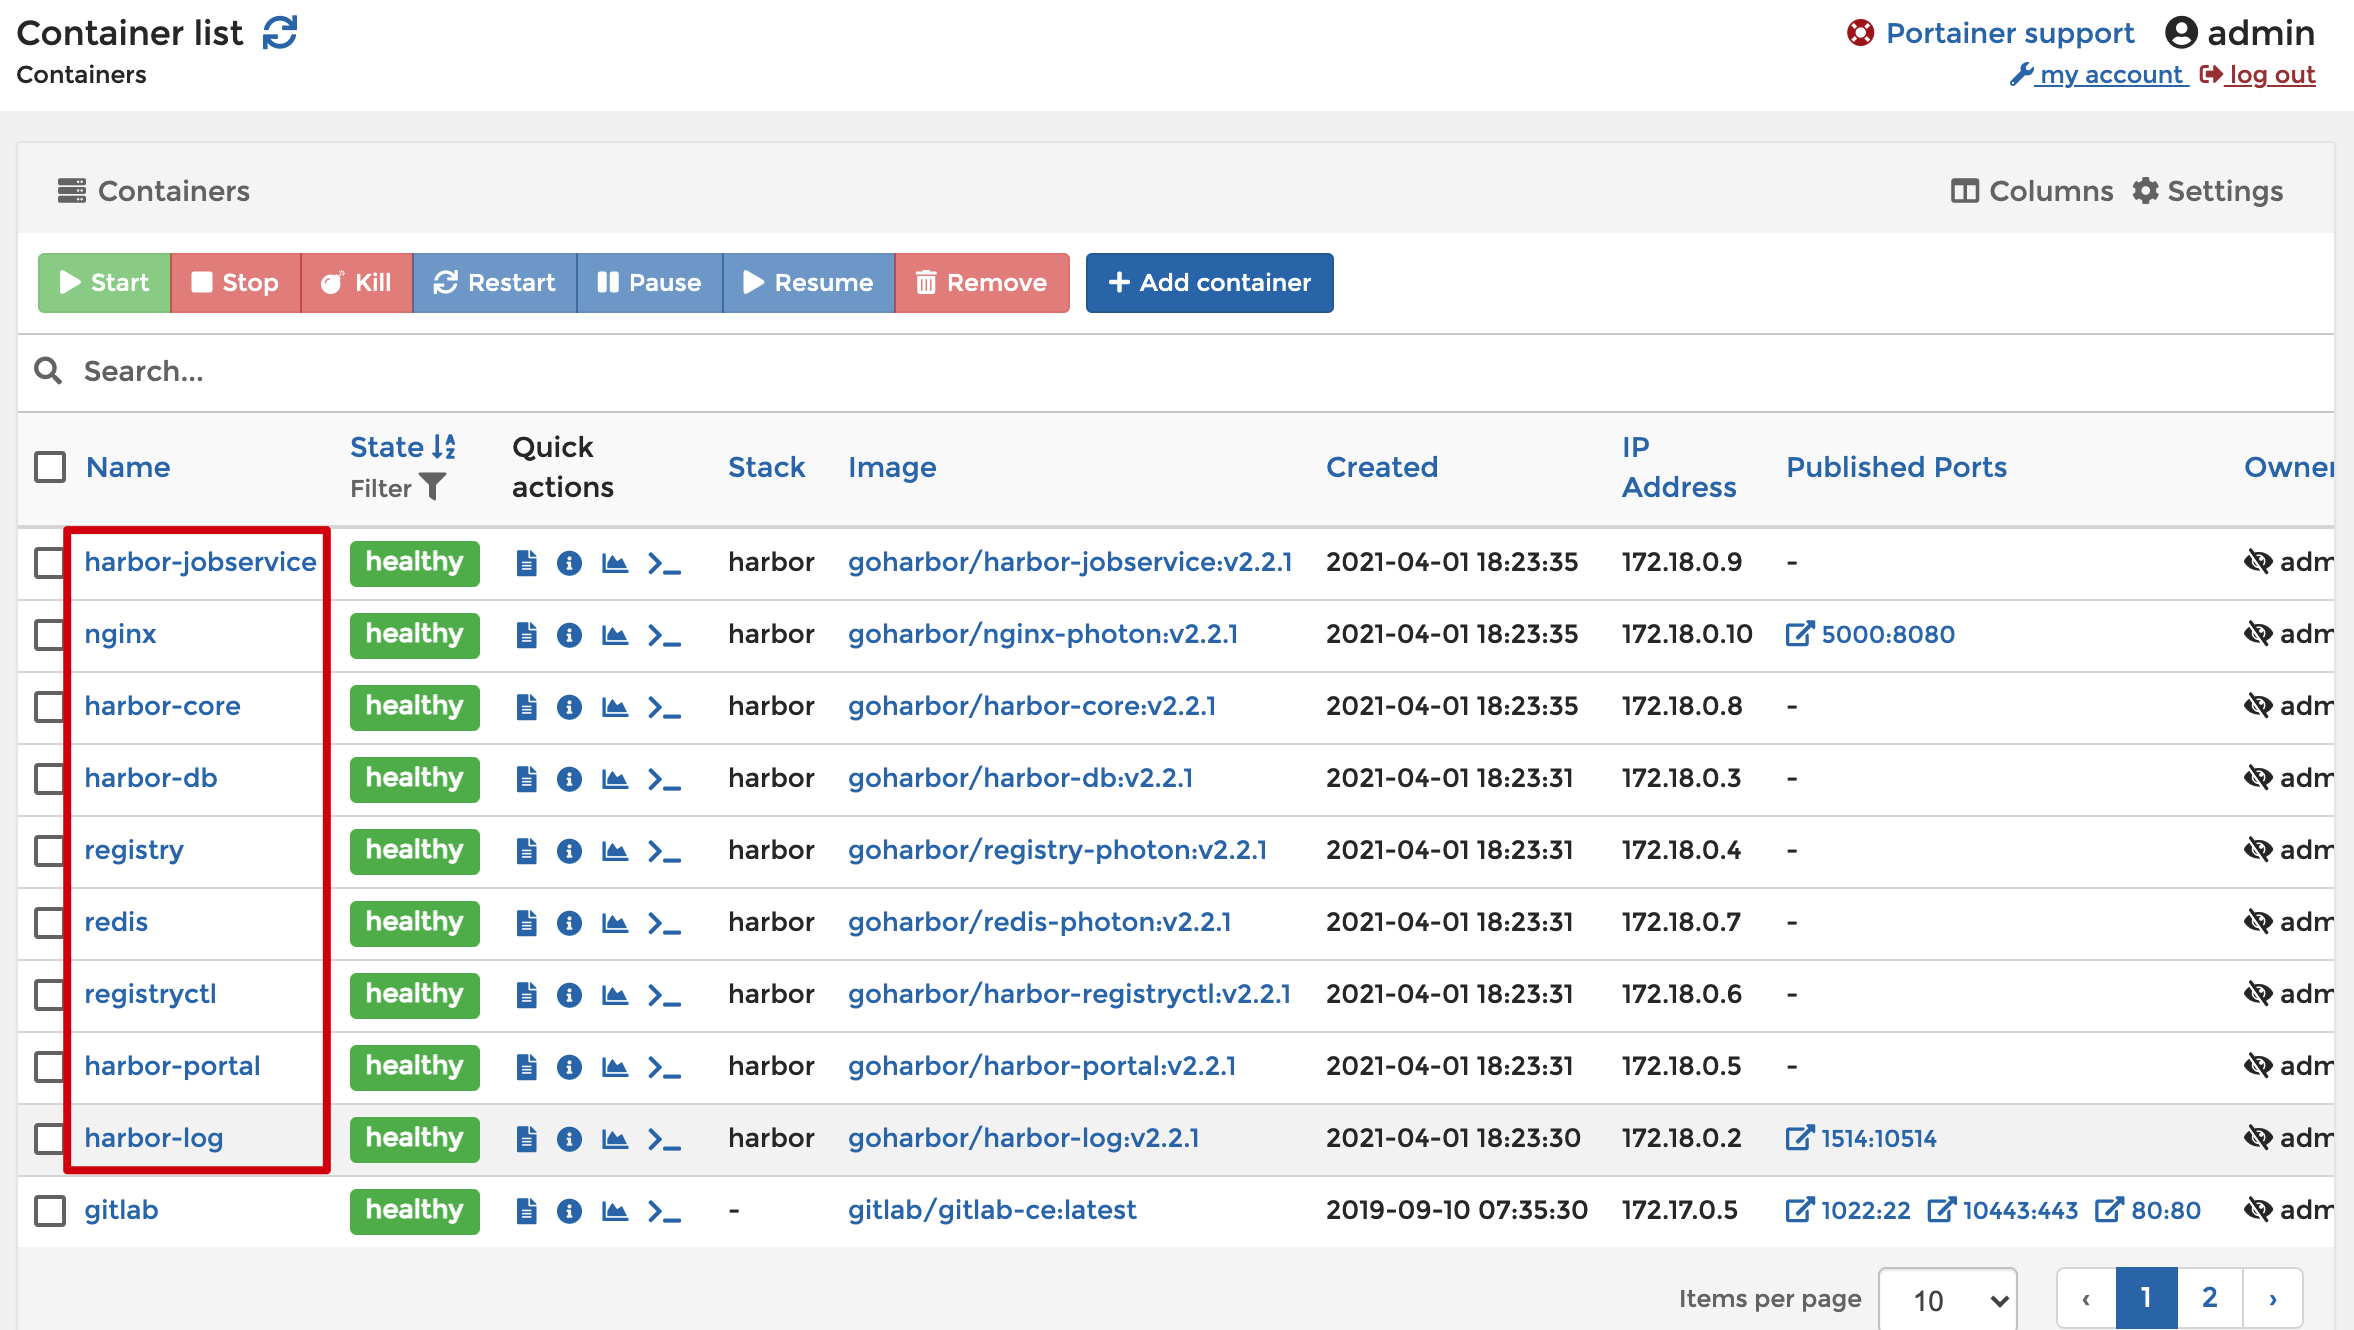
如果需要安装habor,最好将Registry容器停掉或者 容器名不能为registry.

Docker Registry服务器整合很多服务,配置的参数非常多,包括:存储,Redis,Auth,日志,中间件,监控,HTTP,通知,健康检查,代理,兼容性。

部署服务器非常简单,只需要一条命令,映射5000端口到容器,restart机制为总是,并分配当前目录下的data目录作为容器卷,存储镜像数据。可以配置HTTPS方式的访问,参考Docker官方文档,如果是在局域网内访问这个方式即可满足需求。

部署
shell ell
1
2
3
4
5
6
7
8
docker run -d \
-p 5000:5000 \
--restart always \
--name registry \
-e REGISTRY_STORAGE_FILESYSTEM_ROOTDIRECTORY=/srv/registry \
-e REGISTRY_STORAGE_DELETE_ENABLED=true \
-v /srv/registry/data:/var/lib/registry \
registry:latest
测试

从Docker官方的hub拉取ubuntu镜像,这是简写的方式,完整的命令是这样的docker pull docker.io/library/ubuntu,并命名为localhost:5000/ubuntu

1
docker pull ubuntu && docker tag ubuntu localhost:5000/ubuntu

推送镜像到本地的Registry服务器

1
docker push localhost:5000/ubuntu

删除宿主机的localhost:5000/ubuntu并拉取Registry服务器的ubuntu镜像

1
2
docker rmi -f localhost:5000/ubuntu
docker pull localhost:5000/ubuntu
配置

配置Registry服务器的方式有两种,一种是在运行容器指定环境变量重写配置文件,另一种是直接映射yaml配置文件。

使用配置文件的方式,迁移方便。

环境变量重写配置选项

比如重写配置文件存储选项,文件配置如下所示

1
2
3
storage:
filesystem:
rootdirectory: /var/lib/registry

那么运行Registery容器时就需要指定环境变量REGISTRY_STORAGE_FILESYSTEM_ROOTDIRECTORY=/somewhere

1
2
3
4
docker run -d -p 5000:5000 --restart=always --name registry \
-v /srv/registry/data:/var/lib/registry \
-e REGISTRY_STORAGE_FILESYSTEM_ROOTDIRECTORY=/srv/registry \
registry:2

覆盖配置文件

可以使用挂载卷的方式覆盖配置

1
2
3
docker run -d -p 5000:5000 --restart=always --name registry \
-v /srv/registry:/etc/docker/registry \
registry:latest

挂载当前目录下config.yml覆盖容器的/etc/docker/registry/config.yml文件,下面是整个配置文件

1
2
3
4
5
6
7
8
9
10
11
12
13
14
15
16
17
18
19
20
21
22
23
24
25
26
27
28
29
30
31
32
33
34
35
36
37
38
39
40
41
42
43
44
45
46
47
48
49
50
51
52
53
54
55
56
57
58
59
60
61
62
63
64
65
66
67
68
69
70
71
72
73
74
75
76
77
78
79
80
81
82
83
84
85
86
87
88
89
90
91
92
93
94
95
96
97
98
99
100
101
102
103
104
105
106
107
108
109
110
111
112
113
114
115
116
117
version: 0.1
log: ## 日志选项
level: debug
formatter: text
fields:
service: registry
environment: staging
hooks:
- type: mail
disabled: true
levels:
- panic
options:
smtp: ## 邮件通知配置
addr: mail.example.com:25
username: mailuser
password: password
insecure: true
from: sender@example.com
to:
- errors@example.com
loglevel: debug # 即将弃用: 使用Log替代
storage: ##存储选项,
filesystem: ## 本地文件系统,也可以是云分布式存储,比如微软Azure,亚马逊S3,swift,OSS
rootdirectory: /var/lib/registry
maxthreads: 100 ##最大线程数
auth: #用户验证
silly:
realm: silly-realm
service: silly-service
token:
realm: token-realm
service: token-service
issuer: registry-token-issuer
rootcertbundle: /root/certs/bundle
htpasswd:
realm: basic-realm
path: /path/to/htpasswd
middleware: ##中间件类型有registry,repository,storage三种,每种中间件可以像下面的方式使用
registry:
- name: ARegistryMiddleware
options:
foo: bar
storage:
- name: ARegistryMiddleware
reporting: ##监控,可以使用一些在线的监控工具包括bugsnag,newrelic
newrelic:
licensekey: newreliclicensekey
name: newrelicname
verbose: true
http: ## 由Nginx提供的HTTP服务,可以把它理解成配置Nginx
addr: localhost:5000
prefix: /my/nested/registry/
host: https://myregistryaddress.org:5000
secret: asecretforlocaldevelopment
relativeurls: false
tls:
certificate: /path/to/x509/public
key: /path/to/x509/private
clientcas:
- /path/to/ca.pem
- /path/to/another/ca.pem
letsencrypt:
cachefile: /path/to/cache-file
email: emailused@letsencrypt.com
debug:
addr: localhost:5001
headers:
X-Content-Type-Options: [nosniff]
notifications: ## 事件通知,当Registry服务器发生拉取,推送等时发送事件到endpoints
endpoints:
- name: alistener
disabled: false
url: https://my.listener.com/event
headers: <http.Header>
timeout: 500
threshold: 5
backoff: 1000
redis: ##这个用过的都懂
addr: localhost:6379
password: asecret
db: 0
dialtimeout: 10ms
readtimeout: 10ms
writetimeout: 10ms
pool:
maxidle: 16
maxactive: 64
idletimeout: 300s
health: ## 健康检查包括存储驱动,file,http服务,tcp的可用性检查
storagedriver:
enabled: true
interval: 10s
threshold: 3
file:
- file: /path/to/checked/file
interval: 10s
http:
- uri: http://server.to.check/must/return/200
headers:
Authorization: [Basic QWxhZGRpbjpvcGVuIHNlc2FtZQ==]
statuscode: 200
timeout: 3s
interval: 10s
threshold: 3
tcp:
- addr: redis-server.domain.com:6379
timeout: 3s
interval: 10s
threshold: 3
proxy: ## 可以镜像Docker Hub的仓库
remoteurl: https://registry-1.docker.io
username: [username]
password: [password]
compatibility:
schema1:
signingkeyfile: /etc/registry/key.json
Gitlab-ci.yml
1
2
3
4
5
6
7
8
9
10
11
12
13
14
15
16
17
18
19
20
21
22
23
24
25
26
27
28
29
30
31
32
33
34
35
36
37
38
39
40
41
42
43
44
45
46
47
48
49
50
51
52
53
54
55
56
57
58
59
60
61
62
63
64
65
66
67
68
69
70
71
72
73
74
75
76
77
# 定义全局变量
variables:
PROJECT: "offer"
# 这里定义了Maven的jar包存放地址,与我们构建maven私服的时候设置的存放地址一致
MAVEN_REPO: "/.m2"
CI_REGISTRY_USER: "xxx"
CI_REGISTRY_PASSWORD: "xxx"
# 仓库地址
CI_REGISTRY: "xx.xx.xx.xx:5000/"
# 镜像全称
CI_REGISTRY_IMAGE: "mlja/offer"
CI_COMMIT_REF_SLUG: ""
CI_COMMIT_SHA: ""


# 全局脚本,会运行在各个阶段的script前,如果某个阶段里面存在before_script,那么以那个阶段里的为主
before_script:
# 这里定义了打包成功后的Docker镜像名称,每一次提交代码后构建成功的镜像名称都是唯一的
- export IMAGE_FULL_NAME=${CI_REGISTRY_IMAGE}:${CI_COMMIT_REF_SLUG}-${CI_COMMIT_SHA}

# 定义CI执行的阶段,这里可以自己根据情况定义多少个阶段
stages:
- compile
- build
- run

# 编译:
compile:
# 当前阶段的执行镜像,这是自己构建的镜像
image: xx.xx.xx.xx:5000/root/maven:latest
# 属于上面定义的哪一个阶段
stage: compile
# 是否允许失败,允许的话如果当前阶段运行失败还会继续执行下一个阶段
allow_failure: true
# 只在哪个分支生效
only:
- master
# 这里就是要选择哪个runner来执行了,填写创建runner时候指定的标签
tags:
- test
# 运行脚本
script:
- mvn -Dmaven.repo.local=$MAVEN_REPO clean package -Dmaven.test.skip=true
# 因为是Maven编译,所以会有Jar包产物,这里定义产物的过期时间
artifacts:
name: $PROJECT
expire_in: 7 days
paths:
- target/*.jar

# 构建镜像:
build:
image: docker:stable
stage: build
script:
# 这里的变量会自动获取你当前推送代码的gitlab用户和密码以及仓库地址
- docker login --username $CI_REGISTRY_USER --password $CI_REGISTRY_PASSWORD $CI_REGISTRY
# 这里的变量就是我们全局配置定义的了
- docker build -t $IMAGE_FULL_NAME .
- docker push $IMAGE_FULL_NAME
- rm -rf target
- docker rmi $IMAGE_FULL_NAME
only:
- master
tags:
- test
# 运行:
run:
image: docker:stable
stage: run
script:
- docker run -d --name $PROJECT -p 7777:7777 $IMAGE_FULL_NAME
only:
- master
tags:
- test

部署jenkins
1
2
3
4
5
6
7
8
9
10
mkdir -p /srv/jenkins
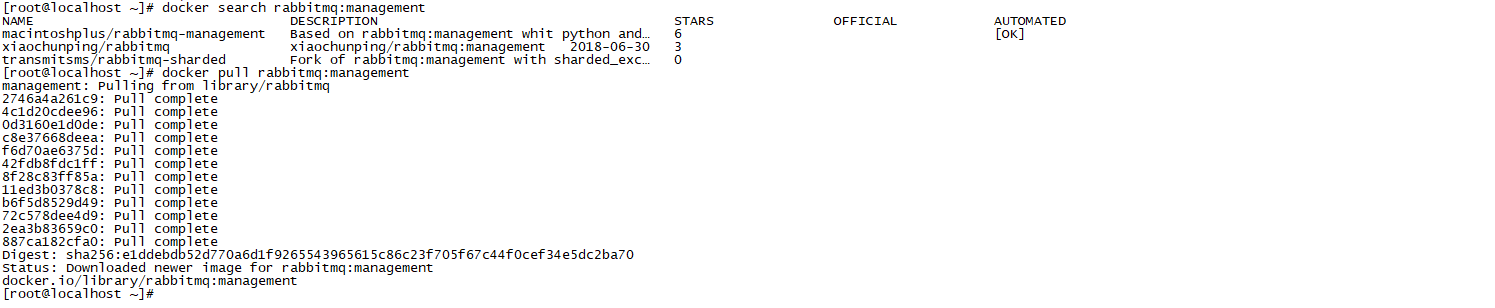
chown -R 1000:1000 /srv/jenkins/
docker pull jenkins/jenkins:alpine
docker inspect jenkins/jenkins:alpine
docker run --detach \
--publish 8080:8080 --publish 50000:50000 \
--restart unless-stopped \
--name jenkins \
--volume /srv/jenkins:/var/jenkins_home \
jenkins/jenkins:alpine
部署RabbitMQ

获取查询的镜像

1
docker search rabbitmq:management

拉取镜像

1
docker pull rabbitmq:management

1
2
3
4
5
6
7
8
# 运行镜像    
docker run -d \
-p 5672:5672 -p 15672:15672 \
--restart=always \
--name rabbitmq \
-v `pwd`/data:/var/lib/rabbitmq \
-e RABBITMQ_DEFAULT_USER=admin -e RABBITMQ_DEFAULT_PASS=2018251 \
rabbitmq:management
1
2
3
4
5
6
7
docker run \
-p 6379:6379 \
--name myredis \
-v /weitrue/install/redis/redis.conf:/etc/redis/redis.conf \
-v /weitrue/install/redis/data:/data \
-d redis redis-server /etc/redis/redis.conf \
--appendonly yes

【Linux】Docker安装与使用
https://weitrue.github.io/2020/06/24/docker/
作者
Pony W
发布于
2020年6月24日
许可协议